Thursday, October 31, 2013

7th day of Christmas - Christmas Tree Mini Album


Here is another way to use the Real Red Goodie Gear Simply Created Kit and turn it into an album to keep for yourself or to give away to a loved one. The little cellophane bags are perfect to put little photos in. The design on the cover was completely inspired by a project I saw at convention this past summer.

Ingredients to make the project:
Stamp Sets:
131829 Merry Little Christmas (clear) $10.95
131826 Merry Little Christmas (wood) $13.95
131889 Oh, Goodie (clear) $8.95
131886 Oh, Goodie (wood) $10.95

Ink:
126949 Real Red $5.95

Paper:
100730 Whisper White Card Stock (40 sheets) $8.50
102482 Real Red Card Stock (24 sheets) $6.95
132340 Season of Style Designer Series Paper (12 sheets) $10.95

Accessories:
130028 Brights Designer Buttons (72 buttons) $7.95
124262 Whisper White Baker's Twine (25 yards) $2.95
132161 Real Red Goodie Gear Simply Created Kit $4.95

Tools:
122334 Simply Scored Scoring Tool $29.95

Adhesives:
104430 Stampin' Dimensionals (300 dots) $3.95
103683 Glue Dots (300 dots) $4.95
Paper Fastners from a stationary store.

Tips & Tricks to make the project:
The red cardstock will be cut at 6 1/2" x 3 3/4". You will score each sheet at 6/8" from the top
If you have a crop-a-dile, please punch two circle from the top. If not, you can you use your paper piercer or any hole punch you have on hand.
You will attach the cellophane bag on top of the open with a strip of monoadhesive. You will cover the monoadhesive so it will not been seen with a strip of the sticker that can be found in the Goodie Gear kit on the top of the cellophane bag.

Click here to start shopping to buy all the products to make your project.

Happy Halloween

In addition to some Halloween goodies, I gave my nieces and nephews a special Halloween treat and that being a toy to play with.     So here are the Halloween tags I made to put on their boxes.    Most of the products are not Stampin' Up!, but I hope you enjoy my little skeleton guy and I hope everyone has a spooky, creepy and crawly Halloween! 
 

Wednesday, October 30, 2013

Anything Goes


This is going to be a fun week at Stamping Royalty.   This week anything goes, so have fun pull out your stamps, paper and accessories and just have fun.    Create something for Halloween or get a card out in the mail that has been on your to do list.

I decided to make a Halloween card for the challenge.     

The Stampin Royalty challenge will be open until 3:00pm (PST) November 4th.
Hope you can join us!

Ingredients to make the card:
Stamp Sets: Tags 4 You, Halloween Hello
Ink:   Versamark
Paper:   Whisper White, Pumpkin Pie, Summer Starfruit, Bacic Black, Witches' Brew Designer Series Paper
Accessories:   Rhinestones, Witches' Brew Designer Washi Tape, Basic Black Embossing Powder
Tools: Labels Bracket Punch, Corner Rounder, Embossing Buddy, Heat Gun, Circle Punches!

Tuesday, October 29, 2013

Trick or Treat

Are you getting excited for Halloween and all the little trick or treaters coming to your door!    Here is a Halloween card for the holiday.

Ingredients to make the card:
Stamp Sets:   Tags 4 You
Ink:   Basic Black
Paper:   Very Vanilla, Bacic Black, Witches' Brew Designer Series Paper
Accessories:   Basic Black Button, Pumpkin Pie Striped Grosgrain Ribbon, Rhinestones, Witches' Brew Designer Washi Tape
Tools:  Labels Bracket Punch, Spider, Border Punch and Corner Rounder from a local craft store

Monday, October 28, 2013

It's all about the candy!


If you ask anyone, Halloween is really all about the candy and how much you can get.    I love the candy corns in the Halloween Hello stamp set.   I was so happy I was able to make a project with them.

The die cut is actually the Labels Collection Framelits, I just trimmed off the point and viola her is a new die cut!

Most of the products are not Stampin' Up! but it was too fun not to share. 

Friday, October 25, 2013

6th day of Christmas - Holly Jolly Snowman Card


Ingredients to make the card:
Stamp Sets:
131823 Tags 4 You (clear) $15.95
131820 Tags 4 You (wood) $19.95

Ink:
131171 Bermuda Bay $5.95

Paper:
122924 Soft Sky Card Stock (24 sheets) $6.95
100730 Whisper White Card Stock (40 sheets) $8.50
121045 Basic Black Card Stock (24 sheets) $6.95
105117 Pumpkin Pie Card Stock (24 sheets) $6.95
132341 Winter Frost Specialty Designer Series Paper (12 sheets assorted) $12.95

Accessories:
119246 Rhinestone Basic Jewels (150 total) $4.95
131206 Bermuda Bay Tafetta Ribbon (10 yards) $5.95

Tools:
132153 Label Bracket Punch $15.95
118402 Scallop Trim Border Punch $15.95
118309 Itty Bitty Shapes Punch Pack
121807 Cupcake Builder Punch $16.95
119871 3/16" Corner Rounder $6.95
129094 1" Square Punch $15.95

Adhesives:
104430 Stampin' Dimensionals (300 dots) $3.95
103683 Glue Dots (300 dots) $4.95

Tips & Tricks to make the project:
Before adhering the two first circles of the snowman, wrap a small piece of ribbon around to the back of the snowman. The adhesive on the back of snowman will keep the small strip of ribbon in place.
You will then take another small strip of ribbon and fold in over the ribbon that is already in place. You can attach the ribbon with a small glue dot.
 Click here to start shopping to buy all the products to make your project.


Thursday, October 24, 2013

5th day of Christmas - Dressing up a wine bottle


I saw this great project on Pinterest and I knew I wanted to share it with all of you for the 12 days of Christmas.   How beautiful is this wine bottle holder.   Afterwards it can be used as a holiday decoration.

Ingredients to make the project:
Stamp Sets:
131781 Festive Flurry (clear) $29.95
131778 Festive Flurry (wood) 39.95

Ink:
131171 Bermuda Bay $5.95
131181 Soft Sky $5.95

Paper:
100730 Whisper White Card Stock (40 sheets) $8.50

Accessories:
117273 Antique Brads (20 brads) $5.95
131206 Bermuda Bay Tafetta Ribbon (10 yards) $5.95

Tools:
126189 Paper-Piercing Tool $3.95
132193 Festive Flurry Framelits Dies $24.95 (optional to be used with Big Shot)

Adhesives:
104430 Stampin' Dimensionals (300 dots) $3.95
103683 Glue Dots (300 dots) $4.95

Tips & Tricks to make the project:
If you have the Big Shot, you can purchase the Festive Flurry Framelits and they will cut the snowflakes with intricate detail. If not, you can free form cut out snowflakes and attach it to the project with dimensionals.
You will need 17" of ribbon. Wrap the ribbon around a bottle of wine. Somewhere an inch below the neck of the bottle tie a knot. The knot will end up being at the top of the snowflake and then rest of ribbon strands will hang down below the snowflake.
Click here to start shopping to buy all the products to make your project.

Wednesday, October 23, 2013

Halloween Decor

Halloween is knocking on our door.   It is right around the corner.    This week Stamping Royalty inspires with a Halloween table setting.    I was drawn into the candle lantern and decided to make my own spooky lantern to put out for the holiday.   I picked up this lantern in the clearance section for the patio items.   How perfect is it for this challenge.    

The ghost is free form cut out.   Lots of hot glue keeps this project from falling apart.    The decoration was attached to the lantern with a circle that I punched two holes through and put some wire through it.    The circle was attached to the decor item with hot glue.    The wires I just twisted around the metal to secure the decor item to the lantern.

The challenge will be open until 3:00pm (PST) October 28th. Hope you can join us!

Ingredients to make the project:
Stamp Sets:   Teeny Tiny Wishes
Ink:   Basic Black
Paper:   Whisper White, Basic Black, Smoky Slate, Frightful Sight Designer Series Paper
Accessories:   Basic Black Button, Rhinestones, Smoky Slate Chevron Ribbon, Doily
Tools   Itty Bitty Banner Framelits, 1/4" Circle Punch, Double Circle Punch, Simply Scored Scoring Tool, Perfect Pennants Sizzex, Big Shot, Eyelet Border Punch

Tuesday, October 22, 2013

Yahoo! 25% off Stamp Sets!


What an amazing sale!    25% off of 25 stamp sets!     The sale lasts until October 28, so make sure you get your stamps before the sale ends!     So many of my favorites are on the list!   Yippee-Skippee, Gorgeous Grunge, Hearts a Flutter!    There are even Jewish Celebrations and Holiday sets!

Happy Birthday Stampin' Up!

Click here to start shopping and saving. 


Inkredible Color Challenge

Now I am all caught up with my color challenges.  This week's Inkredible color challenge is:   Pumpkin Pie, Crisp Cantaloupe and Baked Brown Sugar.    I know these colors would have been perfect for a pumpkin card, but I decided to go against the grain and come up with a card that I could put in my card stash to use for a future use.   Let's just say I don't have too many reasons to send Halloween cards.

Ingredients to make the card:
Stamp Sets:   Affection Collection, Teeny Tiny Wishes
Ink:   Crisp Cantaloupe, Baked Brown Sugar
Paper:   Very Vanilla, Pumpkin Pie, Crisp Cantaloupe, Paisley Petals Designer Series Paper
Accessories:  Very Vanilla Satin Ribbon, Vintage Buttons, Very Vanilla Buttons, Pearls from a local craft store
Tools:   Framelit Die, Border and Butterfly Punch from a local craft store


Monday, October 21, 2013

Inkredible Color Challenge

So I am running a week behind on the color challenges.   Last week's Inkredible Color Challenge was Tangerine Tango, Pear Pizzazz and Melon Mambo.

These colors made me think of autumn and all the blossoms in those rich beautiful colors.

I decided to polaroid the Field Flowers.   I have to say I just love this trend.   It just makes me SMILE.

Since I didn't have chevron paper with very vanilla in it.   I decided to make my own by stamping the Oh, Hello stamp set and then punching out my butterfly from the stamped oval.

Ingredients to make the card:
Stamp Sets:  Field Flowers, Oh, Hello
Ink:  Tangerine Tango, Pear Pizzazz and Melon Mambo
Paper:  Very Vanilla
Accessories:   Corkboard, Button and Polaroid from a local craft store, Witches' Brew Designer Washi Tape, Pearls
Tools:   Elegant Butterfly Punch

Friday, October 18, 2013

4th day of Christmas - Crumb Cake Snowflake Card

 
Ingredients to make the card:
Stamp Sets:
131781 Festive Flurry (clear) $29.95
131778 Festive Flurry (wood) 39.95
131799 Joy to the World (clear) $16.95
131796 Joy to the World (wood) $21.95

Ink:
131174 Baked Brown Sugar $5.95

Paper:
101650 Very Vanilla Card Stock (40 sheets) $8.50
120953 Crumb Cake Card Stock (24 sheets) $6.95
119686 Early Espresso Card Stock (24 sheets) $6.95

Accessories:
119247 Pearls (150 total) $4.95
120999 Very Vanilla Seam Binding (10 yards) $6.95
127554 Natural Designer Buttons (24 buttons) $4.95

Tools:
119882 Scallop Edge Border Punch $15.95

Adhesives:
104430 Stampin' Dimensionals (300 dots) $3.95
103683 Glue Dots (300 dots)  $4.95
 
Click here to start shopping to buy all the products to make your project
 

Thursday, October 17, 2013

3rd day of Christmas -- Door Hanging Treat Holder

So have you been looking forward all week to Thursday to see what will be the 3rd day of Christmas project.    

So how much would you love seeing this treat holder hanging on your door. Perfect to hang in offices, classrooms, neighbor's front door and even your mailbox for your postman/woman!

Ingredients to make the project:

Ingredients to make the mug:
Stamp Sets:
131781 Festive Flurry (clear) $29.95
131778 Festive Flurry (wood) 39.95

Ink:
131181 Soft Sky $5.95

Paper:
100730 Whisper White Card Stock (40 sheets) $8.50
132341 Winter Frost Specialty Designer Series Paper (12 sheets assorted) $12.95

Accessories:
119246 Rhinestone Basic Jewels (150 total) $4.95
131152 Smoky Slate Chevron Ribbon (10 yards) $8.95
129399 Tea Lace Paper Doilies (24 total) $2.95
102210 6"x8" Cellophane Bags (50 total) $4.95
124262 Whisper White Baker's Twine (25 yards) $2.95

 Tools:
120906 2 1/2" Circle Punch $16.95
126189 Paper-Piercing Tool $3.95
132193 Festive Flurry Framelits Dies $24.95 (optional to be used with Big Shot)

Adhesives:
104430 Stampin' Dimensionals (300 dots) $3.95

Optional:
Jingle Bells

Tips & Tricks to make the project:
If you have the Big Shot, you can purchase the Festive Flurry Framelits and they will cut the snowflakes with intricate detail. If not, you can free form cut out the small snowflake and attach it to the project with dimensionals.
Trim a 1/4" off of the top of the doily and attach to the back of the designer paper.
As for the ribbon. You will need a 12" piece and a 20" piece of ribbon. Here are some pictures to help you see how the bag was tied to be hung on a door knob or mailbox.
With the 20" piece ribbon tie a knot leave about a 3" inch of ribbon on both ends of the knot.
Next take your 12" piece of ribbon lie in the center of the knot. Tie a knot around the 12" piece. It should look like the third picture.
Now you can take the two loose ends and tie them around your cellophane bag.


Click here to start shopping to buy all the products to make your project.


Wednesday, October 16, 2013

Halloween Goodie Package

This week's Stampin' Royalty challenges us to create a Halloween Goodie Package.    My niece loves Monster High.   So I decided to make my own version of the Monster High logo, by using the skull from from the Halloween Hello stamp set and dressing it up  The skull was heat embossed and I added a little bow.

I figured the box would be a good size and it would make the parents and kiddies happy on on how many treats they would be given.

The box is a standard box 4" x 4" box with 2" inches on all sides.  The top is a little bit bigger 4 1/4" x 4 1/4".   Now the sides started with 2", but then I trimmed them so I could put a border on the side to dress it up a little bit.

Check out yesterday's post for my nephew's version of the box!

The challenge will be open until 3:00pm (PST) October 21st. Hope you can join us!

Ingredients to make the box:
Stamp Sets:   Halloween Hello
Ink:   Basic Black, Versamark
Paper:   Coastal Cabana, Whisper White, Basic Black, Night & Day Designer Series Paper, Witches' Brew Designer Series Paper
Accessories:   Black Polka Dot Ribbon, Antique Brads, Rhinestones, Witches' Brew Designer Washi Tape, Bermuda Bay Taffeta Ribbon, Black Embossing Powder
Tools:   Simply Scored Scoring Tool, Circle Cutting System, Labels Collection Framelits, Apothecary Accents Framelits, Perfect Pennants Sizzex, Big Shot, Embossing Buddy, Heat Gun, Eyelet Border Punch

Tuesday, October 15, 2013

Halloween Goodie Package

Here is a Halloween goodie box I made for my nephew.    Halloween is perfect for boys. Bats make them think of Batman. Spiders automatically has them thinking Spiderman. 

I figured the box would be a good size and it would make the parents and kiddies happy on on how many treats they would be given.

The box is a standard box 4" x 4" box with 2" inches on all sides. The top is a little bit bigger 4 1/4" x 4 1/4". Now the sides started with 2", but then I trimmed them so I could put a border on the side to dress it up a little bit.

To make the spider extra spooky, I punched him out than applied a layer of Versamark added some clear embossing powder and now we have a shiny black spider!

Stay tuned tomorrow for my niece's treat box!

Ingredients to make the box:
Stamp Sets: Halloween Hello
Ink: Basic Black, Versamark
Paper:   Pumpkin Pie, Whisper White, Basic Black, Night & Day Designer Series Paper, Witches' Brew Designer Series Paper
Accessories:   Polka Dot Striped Grosgrain Ribbon, Rhinestones, Witches' Brew Designer Washi Tape, Clear Embossing Powder
Tools:  Scored Scoring Tool, Circle Cutting System, Labels Collection Framelits, Apothecary Accents Framelits, Perfect Pennants Sizzex, Big Shot, Embossing Buddy, Heat Gun, Spider and Border Punch from a local craft store

Monday, October 14, 2013

Inkredible Color Challenge

Here is last week's Inkredible color challenge is Raspberry Ripple, Primrose Petals, Pink Pirouette and Soft Suede.   So I think in my creating I think I messed up the Soft Suede and ended up using Sahara Sand instead.   Oh well, just close your eyes and pretend Soft Suede is on my project.    Here is my card using the latest trends of polaroids! 

Ingredients to make the card:
Paper:   Sahara Sand, Whisper White, Raspberry Ripple, Pink Pirouette and Primrose Petalas Patterns Designer Series Paper
Accessories:   Pearls and Wooden Arrow from a local craft store
Tools:   Hearts Framelits, Big Shot, Circle Thinlits, Big Shot, Hobby Knife and Corner Rounder from a local craft store


Friday, October 11, 2013

2nd day of Christmas - Christmas Scrap Tree Card

So we all have a million paper scraps, why not put them to use and make a scrap tree!   Doesn't matter what the size of the scrap it can easily be turned into a little tree.

Ingredients to make the card:
Stamp Sets:
131829 Merry Little Christmas (clear) $10.95
131826 Merry Little Christmas (wood) $13.95
130517 Gorgeous Grunge (clear) $17.95
130514 Gorgeous Grunge (wood) $24.95

Stampin' Write Markers:
100079 Old Olive $3.50
119681 Cherry Cobbler $3.50

Ink:
101731 Whisper White Craft $7.50

Paper:
100730 Whisper White Card Stock (40 sheets) $8.50
120953 Crumb Cake Card Stock (24 sheets) $6.95
119686 Early Espresso Card Stock (24 sheets) $6.95
126839 Summer Starfruit Card Stock (24 sheets) $6.95
132340 Season of Style Designer Series Paper (12 sheets) $10.95

Accessories:
119247 Pearls (150 total) $4.95

Tools:
133480 Circle Thinlits $32.95

Adhesives:
104430 Stampin' Dimensionals (300 dots) $3.95

Tips & Tricks to make the project:
Cut a 6x6 piece of card stock for your project and fold in half.
Stamp your background stamp first. The white ink will take a while to dry so you can put that aside while you work the other pieces of the card.
Find a something in your home that already has a curve in it. I just happen to have an old stencil that I used to trace the curve. You could always to it free form, but it helps if you have something to work with.
Using your markers color in the sentiment.
Cut strips of designer paper and early espresso for the trunk.
Die cut your star. If you have an old or non-Stampin' Up! star punch, feel free to use it for the project. You can always subsititue the star for a button as well.
Attach the star with dimensionals.
Attach pearls to the project with your paper snips or tweezers.

Click here to start shopping to buy all the products to make your project.

Thursday, October 10, 2013

1st day of Christmas - Hot Chocolate Mug

You are probably thinking what is she crazy, thinking of Christmas in October! Well in the crafting world it is never too early to start thinking of homemade goodies you want to make for family, friends, co-workers, teachers and neighbors.

So for the next 7 weeks, on Thursday and Friday I will posting Holiday projects! So by November 15th, you will have 12 amazing holiday cards and gift ideas!

Like the gift idea, but you have no time to make them?   Email me today and I can make the project for you.   I am happy to do custom orders for your holiday gifts.

We can also turn a couple of these holiday projects into a class where you and your friends can learn how to make the projects and go home with completed projects at the end of the day.   So gather up 5 or more friends and we can have a party!   

So let's get started with the fun!

1st day of Christmas - Hot Chocolate Mug

Ingredients to make the mug:
Stamp Sets:
131781 Festive Flurry (clear) $29.95
131778 Festive Flurry (wood) 39.95

Ink:
131171 Bermuda Bay $5.95

Paper:
122924 Soft Sky Card Stock (24 sheets) $6.95
100730 Whisper White Card Stock (40 sheets) $8.50
132341 Winter Frost Specialty Designer Series Paper (12 sheets assorted) $12.95

Accessories:
117273 Antique Brads (20 brads) $5.95
114319 Whisper White Organza Ribbon (15 yards) $5.95

Tools:
119855 Large Oval Punch $15.95
126189 Paper-Piercing Tool $3.95

Adhesives:
104294 Sticky Strip (10 yards) $6.95
103683 Glue Dots (300 dots) $4.95

Tips & Tricks to make the project:
Template for the mug can be found at this link.
Instead of trying to cut out the mug handle, use the large oval punch.
Adhere sticky strip to the left, right and bottom of the mug. This will allow for your contents to stay securely inside the pouch without falling out.
Use your paper-piercing tool to make a hole to put your brad through.
To attach the ribbon, use your glue dots. Before attaching the brad to the center of the ribbon. Use wire cutters or your craft scissors to remove the back of the brads. Attach the brad to the ribbon with glue dots

Click here to start shopping to buy all the products to make your project.


Wednesday, October 9, 2013

Stampin' Royalty Color Challenge


This week Stampin' Royalty brings us a color challenge:  Basic Black, Basic Gray, Marina Mist and Tangerine Tango.   I wasn't sure if I would be able to come up with something with these colors, but I kept stamping, punching and adding and this is what I came up with!   I also added a touch of Old Olive to the project.

The challenge will be open until 3:00pm (PST) October 14th. Hope you can join us!

Ingredients to make the card:
Stamp Sets:   Feel Goods, Hello Lovely
Ink:   Basic Gray, Tangerine Tango, Marina Mist
Paper:   Whisper White, Tangerine Tango, Marina Mist, Old Olive, Sweater Weather Designer Series Paper,  I Am Me Designer Series Paper, Modern Medley Designer Series Paper
Accessories:  Pearls, Doily, Vintage Buttons
Tools:   1" Circle Punch, Circle Cutting System, Little Leaves Sizzlits, Itty Bitty Shapes Punch Pack, Decorative Label Punch

Tuesday, October 8, 2013

Winner of my World Card Making Day Prize

I just want to say thank you for everyone stopping by my blog on World Card Making Day!   Thank you for all the amazing comments they truly brought a smile to my face.

Now on to the fun stuff.    The winner of my World Card Making Day Prize is

BloggerCheryl  who said...
Very cute card with so many details to love!!

Cheryl, please email me your full name and address and I will get the prize out to you! 

More 80's inspiration

 
What reminds you more of the 80's than the catch phase, Awesome!   Here it is paired up with some neon colors.

Ingredients to make the card:
Stamp Sets:  Border Banter
Ink:  Daffodil Delight, Pumpkin Pie, Gumball Green, Melon Mambo
Paper:  Whisper White
Accessories:   Stickers and Pearls from a local craft store
Tools:  Corner Rounder from a local craft store

Monday, October 7, 2013

80's inspiration

I recently participated in an all day card challenge and the theme was the 80s.    I am big fan of the 80s.   I loved everything about it, well maybe not everything lol.    One of the challenges was to create a card using Madonna, the material girl, as inspiration!   So a little lace, a little zebra and rhinestones and here it is.

Ingredients to make the card:
Stamp Sets:   Hello Lovely
Ink:   Basic Black, Primrose Petals
Paper:  Whisper White
Accesories:   Rhinestones, Washi Tape and Lace from a local craft store
Tools:  Decorative Label Punch and Corner Rounder from a local craft store
 

Friday, October 4, 2013

World Card Making Day!

Tomorrow is World Card Making Day!   This past March, I had the privilege of being chosen for as Paper Crafts World Card Making Day's winner for the third year!   What an honor to be chosen along with so many incredible designers.    Today I have a special treat for all of you.    You get to visit those amazing designers who won along side me in a World Card Making Day blog hop.   

There are five categories:   Birthday, Love, Thinking of You/Hello, Season's Greetings and Thank You.     Want to learn more on how you can enter this year's World Card Making Day Contest, click here to learn more about it.    The contest is open until October 15th, so get creating and submit.

My advice to those of you thinking of submitting card(s) to the World Card Making Day contest, look at last year's cards that won draw inspiration from them.  It will be the March/April subscription.   Look at your Paper Crafts magazines or check out what the latest trends are on their blog or their Pinterest site.   Lastly, don't be afraid to just try.   I must submit about 5 cards and let's just say I am always surprised which one was chosen!    As they say you have to be in it to win it!

Here are my three cards that have been chosen in past year's. Thinking of You/Hello, Thank You and this year's Birthday card.

Here's the next stop on the blog hop is Tarynne Wise.      At the end of the blog hop make sure to stop at Paper Crafts there is an amazing giveaway at the end.

In honor of the day, I have a giveaway.     Just leave a comment and I will draw a random winner on Tuesday, October 8th to win the Paper Pumpkin kit  along with all these great Halloween embellishments, ribbon, buttons, glitter and washi tape!

If you find yourself unable to get to a the next stop in the blog hop, here is the complete list of everyone participating!

1. Agata Pfister
2. Amber Kroening
3. Angeline Yong Jeet Leen
4. Ashley Marcu
5. Carolynn Wilson
6. Chunyuan Wu
7. Emily Leiphart
8. Heather Hoffman
9. Jamie Greene
10. Jocelyn Olson
11. Kerrianne Bowen
12. Laura Bassen
13. Leigh Penner
14. Lorena Cantó Lavería
15. Mercedes Weber
16. Mignon Jessica Bear
17. Pamela Ho
18. Sarah J. Moerman
19. Stasia Sloma
20. Tarynne Wise

Here is my card and the ingredients and tips to make the card:
Stamp Sets:  Remembering Your Birthday, Create a Cupcake, Gorgeous Grunge
Ink:  Melon Mambo, Blushing Bride, Versamark
Paper:   Whisper White, Pink Pirouette, Brights Color Collection Designer Series Paper, Melon Mambo
Accessories:   Pearls, Gingham Garden Designer Washi Tape, Dazzling Diamonds Glitter and Heat & Stick Powder
Tools:   Simply Created Build a Banner Kit, Owl Builder Punch, Cupcake Builder, Circle Thinlits, Stamping Sponges, Circle Sizzex, Big Shot, 3/4" Square Punch, 1/2 Circle Punch, Crop-a-dile, Embossing Buddy, Heat Gun

Now the fun stuff, the tips and tricks to make the card.    Yes, it is a card.     First I made the tag along with the circle behind it.   I was all set to put it all on a piece of cardstock, but as soon as I did I realized it stood all by itself and it didn't need anything more.     So I did adhere the tag to a folded piece of card stock, I then slowly trimmed around the tag and the circle.
Next comes the sponged chevrons. I sponged some blushing bride ink with the stencils that come in the Simply Created Build a Banner Kit.
The tiny heart I added some dazzling diamonds on to it, but first I heat the paper with Heat & Stick powder and Versamark and then added the dazzling diamonds and lastly heat one last time to keep the glitter in place.    This is perfect when you want to make your own glitter paper.

My all time favorite tip is making a tag.    First snip your corner.    Then take the cut corner, flip attach it to the other side that has not been cut.    Viola you now have a way to trim the corner so it matches your other side.

Hope you had fun visiting my site!    If you enjoyed visiting my site, you can continue following me after today on Pinterest, Facebook or my Stampin' Up! website.   Thank you for stopping by!  

Thursday, October 3, 2013

Inkredible Color Challenge

This week's Inkredible color challenge is:   Primrose Petals, Blushing Bride, Crumb Cake and Very Vanilla.

What can I say I love the color pink.   It makes me happy.

Here is my card along with the ingrdients to make it:
Paper:   Whisper White, Blushing Bride, Crumb Cake, Primrose Petals Patterns Designer Series Paper
Accessories:   Doily, Alphabet Stickers and Pearls from a local craft store
Tools:   Bitty Butterfly Punch, 7/8" Scallop Punch, Beautiful Butterflies Bigz Sizzex, Big Shot

Wednesday, October 2, 2013

Stamping Royalty Photo Challenge

This week Stamping Royalty brings us a photo challenge.     I decided to do another card in Gold what can I say I am loving the way Gold embosses.   What can I say it makes me happy.    To add color to the doily I sponged on some Cajun Craze and Summer Starfruit.  Two colors blended together beautifully.    I put the card together and then decided at the last minute that the card needed a little pizzazz so I pulled out my scoring board and added some horizontal score lines to complete the project.

The Stampin Royalty challenge will be open until 3:00pm (PST) October 7th.
Hope you can join us!

The Paper Crafts Moxie Fab World  All that glitter challenge is open until October 14th, so it is not too late to break open your gold ink pad, paper and embossing powder and start creating!

Ingredients to make the card:
Stamp Sets:   Tags 4 You, Truly Grageful
Ink:   Versamark, Cajun Craze, Summer Starfruit
Paper:   Very Vanilla, Gold, Sweater Weather Designer Series Paper
Accessories:   Vintage Buttons, Very Vanilla Satin Ribbon, Gold Embossing Powder, Doily
Tools:  Heat Gun, Embossing Buddy, Sponge, Label Bracket Punch, Simply Scored Scoring Tool


Tuesday, October 1, 2013

October Classes and Specials

There is a lot of great things happening in October!   
Clubs, classes and specials! 

First the most exciting addition is the Tool of the Month club.
 
October Tool of the Month: Chevron Border Punch

If you are like me, you love the latest and greatest in tools. Here is a way to build your tool collection with a tool every month! Along with each tool, you'll receive three REAL card samples using the featured tool each month. This is NOT a card kit, you will be receiving three handmade cards ready to send out to your family and friends.

You will also get a full color photo and list of supplies for each card (including measurements) so you can use your own cardstock and supplies to duplicate the cards at home. You'll love having a completed card to look at and reference when you go to create yourself!

Each month you'll receive a package in the mail that includes:
Tool of the Month: tool valued between $15.95-$19.95**
Three Handmade Cards: completed cards created with the featured tool
Full Color Printout: photo and supply list for each card
Tool of the Month Club costs $35/month. When you participate in 3 consecutive months, you'll get $5 off the 4th month!

Anyone can join, at anytime... no matter where you live in the US (US only).

Do you want to just purchase the Three Handmade Cards and the Full Color Printouts to send to family & friends?
Do you want to use the card samples for your own personal classes?

Cost for just the cards and printouts: 12$ (price includes shipping & handling).

Email me today if you are interested in purchasing this month's tool of the month!

Monthly Card Class
      
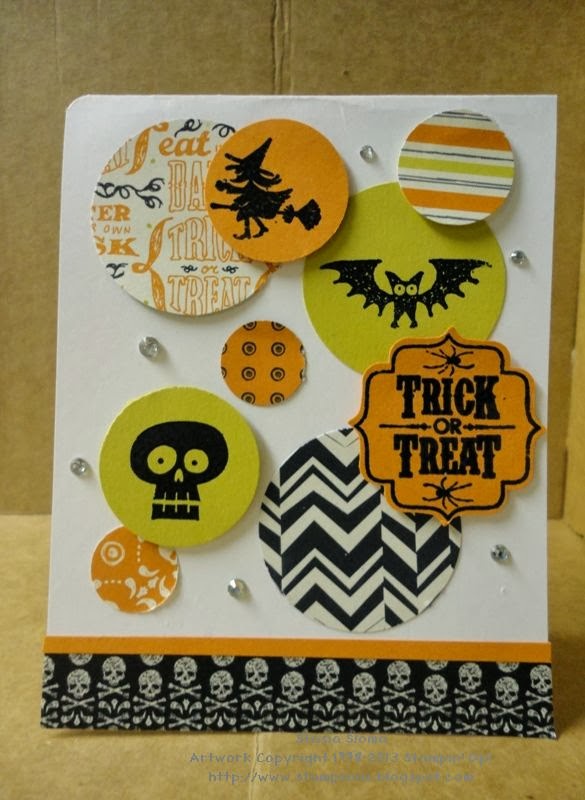
This month's card class we will be making the 3 homemade cards featured in the Tool of the Month club package.
    
Learn how to use the Circle Thinlits, Sponging and Paper Piercing.   
The classes will be held Tuesday, October 22nd and Thursday, October 24th at 7p.m.
Class fee: 12$
Please RSVP by October 17th if you will be coming.
Location: Totowa, NJ

If you purchased the Tool of the Month package, the class fee will be waived and you will be able to pick up your package the night of the class.    

Scrapbook Crop Day
      
Every 3rd Sunday of the Month,  I will be hosting a crop day in my Stamping Studio.   
So from 1pm - 10pm, come scrap the day away.    Just bring your photos, paper, adhesives and embellishments and leave the rest of your scrapbook supplies at home.   
Your 10$ crop fee will provide you full access to my 100+ punches, Big Shot dies and framelits, 100+ stamp sets and 50+ ink pads.    You will also be able to use my overflowing scrap bins of colored card stock and designer paper.     Snacks and drinks will be provided.
      
Dinner is not included in the crop fee, we will be ordering take out for those that are interested.
NEXT CROP DAY:   OCTOBER 20, 2013
Please RSVP by October 17th if you will be coming.
Location: Totowa, NJ

Scrapbook Page of the Month
   
Every month do you find yourself finding more hours to scrapbook in a day.   Does the pile of pictures get larger than the pile of pictures that find their way into a scrapbook!
Well I have found a way to make life a little easier for all of you.   Every month, I will be creating a 12x12 completely embellished scrapbook page.   All you need to do is add your own photos along with some journaling.    
The completed pages will cost 15$.   Price includes shipping & handling.
Email me to order your scrapbook page.


October Special

Get $25 extra hostess dollars when you have a 250$ party this month! So 65$ worth of free hostess dollars!!!!   So make your party list and email me today to host your workshop.    No time for a home workshop, have one online!!    That means it’s easier than ever to earn even more free products as a hostess. It’s Stampin’ Up!’s 25th anniversary so let’s bring on the parties and free products!