Saturday, October 31, 2009
Happy Halloween Stampin' Up! Style
Click here to see photos of all the fabulous photos!!! It's no wonder why we all love Stampin' Up! Who wouldn't want to work for a great company like this!
6 sheets of paper = 28 projects!

Friday, October 30, 2009
Halloween Scrapbook Page
 Here is a Halloween scrapbook page I put together all it needs is a few pictures of my niece and nephew in their Halloween costumes! I can't wait to see the Little Mermaid and Mickey!
Here are the ingredients to make the project:
Stamp Set: Scary Skeleton
Ink: Basic Black
Paper: Cast-a-Spell designer series paper, Basic Black and Whisper White
Accessories: Wide Grosgrain Old Olive Ribbon, Old Olive Buttons
Tools: Big Shot, Simple Letters and Numbers Sizzex and Sizzex Circles #2
Special Touch: The skeletons were cut out and attached to the page with dimensionals. The circles as well were die cut and attachd with dimensionals. The tailored bow was the finishing touch.
Thursday, October 29, 2009
Lots and Lots of Cards!
Stamp Sets: Batty For You, Teeny Tiny Wishes
Accessories: Basic Black Wide Grosgrain Riboon and Basic Black Brads
The last card uses the following ingredients:
Wednesday, October 28, 2009
Lots of Halloween Treats
Stamp Set: Sweet Treats
Tuesday, October 27, 2009
Scallop Square Boxes
Yesterday I learned how to make a box that fits nicely with the Sizzex Scallop Square. Click here to see how to make it! Thank you Colleen for showing me first hand how to make it. I am box challenged, but usually after I make a few I am a pro. Hence I made four of them tonight! Click here to see Colleen's sample that she just posted on her blog.

The first one I made with the Sweet Treats stamp set.
Ingredients to make the project:
Stamp Set: Sweet Centers
Ink: Pumpkin Pie and Basic Black
Paper: Cast-a-Spell Designer Series Paper, Basic Black, Whisper White
Tools: 1 3/4" and 1 1/4" Circle punches, Big Shot and Sizzex Scallop Square
Accessories: Wide Grosgrain Basic Black Grosgrain Ribbon.
Special Touch: The center was colored in with my Stampin' Write Markers and then punched and attached with dimensinals.
The next three use very similar products the last two I just did a patchwork theme to use up scraps of the Cast-a-Spell designer series paper. To make the patchwork I punched the squares with my 1 1/4" square punch otherwise the ingredients listed below will be for all three boxes.
Ingredients to make the project:
Stamp Set: Pumpkin Patch, Teeny Tiny Wishes
Ink: Pumpkin Pie, Old Olive, Basic Black
Paper: Cast-a-Spell Designer Series Paper, Basic Black, Whisper White
Tools: Circle Scissor Plus, Word Window and Modern Label Punch, Big Shot and Sizzex Scallop Square
Accessories: Wide Grosgrain Basic Black Grosgrain Ribbon and buttons from a local craft store
Monday, October 26, 2009
Final Deal of the Week

116214 Princess Party Kit
Regular Price $15.95
Special Price $9.99

Special Price $9.99
Just made it!

Just made it this week with Mojo Monday. Here is my card for last Monday's challenge.
Ingredients to make the card:
Stamp Sets: Serene Snowflakes, Christmas Punch (hostess set)
Ink: Soft Suede
Paper: Whisper White, Soft Suede and Christmas Cocoa Speciality Designer Series Paper
Accessories: 5/8" Whisper White Satin Ribbon, Pretties
Tools: Wide Oval Punch

Busy Weekend
 If you were wondering why no posts this weekend, we'll that's an easy answer. It was a very busy weekend. It started with a birthday party on Friday, followed by standing in the rain to get the latest book by Clarenece Clemons, Big Man signed and then a day of stamping with friends!
Friday, October 23, 2009
Housewarming Card

Thursday, October 22, 2009
Halloween Treat Holder

Wednesday, October 21, 2009
Gum Halloween Treat Holder

Can you believe that Halloween is coming up so quickly! Here is a Halloween Gum Holder that I made by copying the template from my friend Colleen. She made me one last year and I just took the dimensions and made my own with this year's products.
Tuesday, October 20, 2009
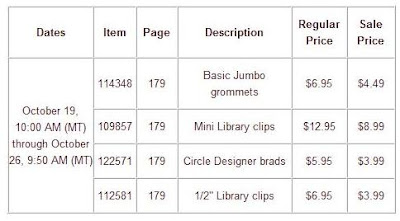
This Week's Specials! Accessories
Click here to go to my online store and purchase your accessories today! Offers only available until noon at 10/26/09!
Inkredible Color Challenge

Monday, October 19, 2009
Pals Paper Arts Sketch Challenge #2

 trip of Whisper White and attached on top of the Soft Suede. Taking both pieces of card stock, I wrapped them around the card and attached them together in the back. I then took the organza ribbon and attached it to the card stock in the back and then brought it around the front and tied a knot. I slipped the scallop circle to the belly band. Now when the band comes off so does the scallop since it is attached.
 Pals Paper Arts Sketch Challenge

Sunday, October 18, 2009
Mojo Monday #108
 Here is this week's Mojo Monday. Here's a card I made for a friend of mine that has not been feeling good lately.
Friday, October 16, 2009
Ink Color Challenge
 This week's color challenge is Taken with Teal, Rose Red and Old Olive.
 Thursday, October 15, 2009
My Favorite Things
 I just love the way all the new InColors look together. It kinda reminds me of a rainbow. So here I took stamp set case and made it into a container to put just a few of my favorite things! Yes, the song from the Sound of Music is running through my head as I type up this post.
 Here are the ingredients to make the project:
Stamp Sets: Favorite Things, I Heart Lists, Flight of the Butterfly
Card Stock: Razzleberry Lemonade Designer Series Paper, Whisper White, Soft Suede, Dusty Durango, Crushed Curry, Melon Mambo, Rich Razzleberry, Bermuda Bay
Ink: In Color 2009 Stampin’ Write Markers, Bermuda Bay Classic Stamp Pad
Accessories: Bermuda Bay and Melon Mambo Polka Dot Ribbon, 5/16” Jumbo Brads, On Board Long Board, Stampin’ Dimensionals,
Tools: Butterfly Punch, 1 3/8” Circle Punch, Circle Scissor Plus, Crafter’s Tool Kit, 3/16” Corner Rounder, Crop-a-dile
Special touches on the project: I started with make the largest circle in Bermuda Bay and then I went a 1/4" smaller to make the next circle. I just layered the smaller circles on top of the large circle. When I was done I just cut the circle down the middle. The center came the circle punch. I then layered all of them on top of the white circle in the same size as the Bermuda Bay. I ended up putting a strip of On Board Long Board the length of the circle and width of the polka dot grosgrain ribbon. The 6 layers of rainbows was a little too think just to lay a ribbon on top of the white circle and not have it look funny. I punched two holes on top of the stamp case and threaded the ribbon through and tied a knot on top.
Wednesday, October 14, 2009
Boo Wall Hanging
 I just love this photo of my niece and nephew from last halloween. Here is a wall hanging I made with the photo. Perfect to hang on the wall for a seasonal decoration.
 Tuesday, October 13, 2009
Manly Happy Birthday
.JPG) Here's a birthday card I made for a co-worker of mine.
Here's a birthday card I made for a co-worker of mine.Here are the ingredients to make the card:
Stamp Sets: Music Expressions and On Your Birthday
Ink: Basic Brown and Earth Elements Watercolor Crayons
Paper: Bella Rose Designer Series Paper (retired), To the Nines Speciality Designer Series Paper, Very Vanilla and Chocolate chip
Accessories: Twill Chocolate Chip Ribbon, 5/16" Chocolate Chip Brads
Tools: 1" square punch I purchased at a local craft store and the 1 1/4" square punch, Blender Pen
Monday, October 12, 2009
This Week's Deals - Sizzex!!!

116760 Pop-Up Three Tier Cake Bigz XL die
Special Price: $25.49

Click here to go to my online store and purchase your Sizzex deals today! Offers only available until noon at 10/19/09!
An Old Friend
 Here is a card I made with an old friend, the retired color, Tangerine Tango.
 Here are the ingredients to make the card:
Stamp Sets: Polka Dot Background Stamp, Only Ovals
Ink: Tangerine Tango
Paper: Tangerine Tango, So Saffron, Whisper White
Accessories: Staple, So Saffron Button and So Saffron Wide Grosgrain Ribbon
Tools: Big Shot, Beautiful Butterflies Sizzex, 1 3/4" Circle Punch, Circle #2 Sizzex, Scallop Oval Punch, Punches Plus Classy Brass Templates, Scallop Edge Punch, Paper Piercer
Special Touches on the Card: I punched the circle and then used the brass template and the paper piercer to make the piercing in the circle. I die cut the white circle and then stamped the backgound punch. I tolded a piece of paper and stapled it for an embellishment. Scallop borders and the tailored bow are the finishing touches.
Sunday, October 11, 2009
Pals Paper Arts Challenge
 This week's Pals Paper Arts Challenge is a color one. The colors are Perfect Plum, Old Olive and Pumpkin Pie with a little neutrals mixed in.
 Mojo Monday #107
 Here is this week's Mojo Monday sketch.
Accessories: 5/16" Chocolate Chip Brads and Chocolate Chip Wide Grosgrain Ribbon
Thursday, October 8, 2009
Happy Birthday Princess
 In just a few short days, my little princess Julie will be turning 4. Where has the time gone. I can't believe this little fire cracker is now a big girl which she makes sure to clarify every time she gets. I was not happy to be shopping in the big girl section. I just couldn't get myself to look at the non-pink clothes. I am not ready to see her in black.
 Here is a card to celebrate the occasion as well as the ingredients to make it:
Stamp Sets: Perfect Princess (retired)
Ink: Rich Razzleberry
Paper: Cottage Wall Designer Series Paper, Orchid Opulence, Rich Razzleberry and Whisper White
Accessories: Circle Fire Rhinestone Brads, Whisper White Orgaza Ribbon
Tools: Scallop Punch from a local craft store
Special Touch on this Card: The only special touch on this card is that I stamped the crown on Orchid Opulence card stock and then cut it out. Then I stamped the image again this time on Rich Razzleberry so I can get the diamond to cut out.
Tuesday, October 6, 2009
Inkredible Color Challenge


