Wednesday, December 31, 2008

Love You Much Gift Tag


Here is a gift tag made with the Love You Much stamp set from the bundle. I started with a piece of Riding Hood Red that I die cut with my Big Shot and the Scallop #2 Die, which followed wtih a Pink Pirouette circle I cut out with my Coluzzle. Next I punched out a piece of the Candy Lane designer series paper with my Paper Shapers 2 3/4" circle punch. Next I stamped the image on a piece of Pink Pirouette. I also stamped the heart image on a piece of the Candy Lane paper and cut it out and adhered it to the center of the heart. I cut the image out with my scallop circle punch. Lastly, I laid down a strip of Pink Pirouette and added two vintage brads. I just love this bundle.
Happy New Year Everyone!

Tuesday, December 30, 2008

Love You Much Bundle


Want a sneak peak into the 2009 Spring Summer Idea Book and Catalog!!! We'll here it is, the Love You Much Bundle (item 115404). It coontains all the products to create beautiful Valentine's Day projects and from December 23, 2008 through January 31, 2009, you can purchase the Love You Much Bundle at 20% off the retail value! The bundle comes with a 6 piece stamp set, 12 sheets of double sided designer series paper and the Heart to Heart punch. Want to get your bundle, click here to be brought to my Stampin' Up! website, click on the Shop Now button in the top right hand corner and purchase your bundle today!

2009 is on it's way....

The 2009 year is on it's way. Here is my monthly planner I made with the Create-A-Calendar '09 kit that is in the Holiday Mini. I paired it up with an Art Journal and the Calendar background stamp set and the Full Calendar stamp set.
The front, I used a piece of Bashful Blue card stock which I made the ring binding with the Spiral punch. A little trick I did this time, on the top and the bottom of the binding, it is alway a little tricky to see how much you need to cut off so the punch be able to fit and what will line up with the binding. This time I left a little border on the top and the bottom with the card stock so the sheet of card stock would not fill up the whole front of the journal. I adhered the self-adhesive strips from the scrappin' kit to the top of the bottom to fill in where the card stock didn't cover. It gave it a more complete and more polished look. In the past, you would need to be careful and cut a little bit of the card stock so the punch would fit so you can start the spiral edge and then the piece would be left. You would adhere it down to your book, but eventually with wear and tear it would come up. This way, it keeps the card stock down and reinforces the top and bottom of the journal in place. The front the added additions were the Button Bouquet and the Bashful Blue grosgrain ribbon. The rest was all fron the kit.
On the inside I cut calendar portion of the kit as closely to the edge as possible. I then turned over the paper and put the designer side of the paper around the edge of the calendar. I filled in the rest of the page with coordinating card stock and to give it a more polished look, I put a strip of whisper white in between the patterned designer paper from the kit and the card stock. The numbers I filled in my retired real red journaling marker.
Still not sure you need the Create a Calendar, check out my friend Colleen's great idea in making it a mini scrapbook calendar. Click here to be brought to her blog to see her creation.

Saturday, December 27, 2008

2 More Fabulous Christmas Cards

Here are two more fabulous Christmas cards from fellow demonstrators that came in the mail in the last couple of days. One comes from my friend Colleen Triglianos made with the Snow Swirled stamp set. Love embossed tree! Then the second card comes from Yvette Martinelli, it is made with the Scandinavian Season. I love the little bling on the star. Beautiful cards!

Wednesday, December 24, 2008

Merry Christmas To All!

I want to wish all of you a Merry Christmas. I am very fortunate to have so many wonderful friends and family in my life. It's going to be very crazy busy the next two days so I wanted to take a minute to post some of the wonderful cards and gifts I have received.
The first projects come from my friend Colleen. She is truly amazing. Look at all the wonderful projects I have received from her. A gift card holder, my new year of color book, 8x8 scrapbook made with the I wish scrappin' kit!! and her fold out holiday card. Take a minute a visit her blog she has done cute little gift boxes and gifts for her little guys leading up to Christmas day. So many great ideas. Click here to be taken to her blog.


The next two come from fellow demonstrators, Lisa and Debbie. Lisa's card is made with the Season of Joy and Debbie is the cute little bird and tree set from the Holiday mini, Season of Friendship. Click on their names to be brought to their blogs. Both are very talented, you should see all the beautiful things on their blogs.
The next thre cards come from my customers. The very adorable Snow Time comes from my friend Sue, Kelli made the beautiful Happy Holidays card and my friend Sharon made the wonderful photo card of her children. Love the title, laughing all the way. You may see that on scrap page in the near future. Kelli is very talented, you need to see some of the beautiful altered projects on her blog. Click on her name to be brought to her blog.
I have to say I have some pretty talented friends. Thank you ladies for all the beautiful things. I am truly grateful and amazed by the talent that surrounds me. Merry Christmas to Everyone!


Tuesday, December 23, 2008

Big Snowflake Homemade Card


Here's a card I made for a special someone in my life this holiday season. I started with the Sizzex Snowflake. I die cut it with Big Shot and a piece of chipboard. I then sponged on white craft ink and sprinkled iridescent ice embossing powder and embossed. In the center of the snowflake is a build a brad with the heart stamped from the Big Bold Birthday stamp set. I layered the snowflake on top of shimmery white card stock and the Real Red Patterns designer series paper. The finishing touch was the scallop edge on the card and the silver cord.

Monday, December 22, 2008

Quick and Easy Card


Here's a quick nice and easy card. It is paired up with Chocolate Chip patterns paper and the jumbo wheel Santa's Lineup. I rolled Santa's Lineup on a piece of Kraft paper. Wide chocolate grosgrain was tied in the middle. The image comes from my favorite of all Christmas sets, Deer Friends. I put a red pom pom in the center for his nose and layered it on punched circles. Only a few more days until Christmas, everyone ready? I am almost there, now I have to go food shopping and get things to make for the big day.

Saturday, December 20, 2008

Back to Back Color Challenges


I decided to get a head start on next week's challenge. It is Sahara Sand, Old Olive, Real Red and Very Vanilla. This just happens to be the colors in last years Dashing Designer Series paper. Since I had plenty of sheets left I decided to pull it out for this challenge and continue scrapping. The stamping I did on the page was the holly with my markers that comes from the Holiday Trinkets stamp set, the greeting comes from a retired Season's Greeting stamp set that I have hold onto, the year is stamped from the Short Order Number set. I created the scallop circle around the holly with my Coluzzle cutting system and my 3/4" circle punch. The finishing touch was the wide red grosgrain ribbon.

Friday, December 19, 2008

This Week's Color Challenge


Well with the snow storm here in NJ, I gained a few extra hours that I didn't expect with being let out of work early. I decided to treat myself and do a few scrapbook pages. I started on scrapping the Christmas card photo cards I received in the mail. This is just the beginning, I swear I get more and more cards every year.

This week's color challenge was Sage Shadow, Always Artichoke, Certainly Celery and Bashful Blue. So I decided to cut strips of card stock. I die cut some Snowflakes with my Big Shot that I put a vintage brad through the center. I also punched some snow blossoms and put a pewter eyelet through the center. The W was diecut with my Serif Essentials. The rest of the word Winter was stamped with the Schoolbook Serif alphabet. I made an ornament with my PaperShapers 2 3/4" circle punch and put a round tab punch on the top with some silver cord tied. Another diecut snowflake was placed in the center. The finishing touch was some celery grosgrain adhered to the page with a bow tied and attached to the page with a mini glue dot.

Wednesday, December 17, 2008

More Holiday Tags

Here's another holiday tag I created. This one is for these great little Margarita mixes I found in Home Goods. They come in a 4 pack. So I am splitting them up and giving them out as office gifts. I wrapped them with red tissue paper and tied a real red striped grosgrain ribbon. I die cut the scallop #2 with my big shot and then layered it on green galore coluzzle cut out and a white paper shapers 2 3/4" circle punch. I stamped the drink from the Cheers to You stamp set. I colored in the image with my Stampin' Write Markers. I stamped the greeting from the retired So Many Sayings stamp set. The finishing touch was the real red and green galore brads. I tied the tag to the package with linen thread.


Tuesday, December 16, 2008

It's a Wrap

Here are some gift tags I came up with in the search of the one I mass produced for all my Christmas gifts this year. First I started with the Holiday Treasures designer series paper paired up with the Deer Friends stamps. I attached a mini glue dot and put a red pom-pom for the nose. The paper and the Deer Friends was layered on top of punched circles and Coluzzle circles and die cut Sizzex #2. Followed by a strip of read red card stock across the center. I tied a candy candy on top with a piece of wide grosgrain ribbon after punching a hole with my crop-a-dile.


The next one, I decided to do take out the Frosty Day designer series paper. I stamped the snowman image in Chocolate Chip then I pulled out a q-tip and cleaned off the ink on the nose and then with my Stampin' Write marker, I colored in the nose. Same idea was done with this tag, I layered the paper and the image on punched circles, scallop circles, Coluzzle circles and the die cut Sizzex #2. I added a strip of chocolate chip card stock and some bashful blue brads.


The last one was the one I decided to mass produced. I think the 2 sets of large circles did me in on the last two tags. One of them was being done by the Paper Shaper 2 3/4" circle, but the other one I had to pull out my Coluzzle and I have to say I wasn't looking forward to mass cutting out circles with the Coluzzle. Not to mention there was no place for me to write the to and from.


So here is what I came up with. I die cut the with the Scallop #2 , the old olive and then the Bella Rose designer series paper. I cut the Bella Rose in half when I was done. I attached the one half to the old olive scallop and then attached a strip of old olive grosgrain ribbon. As for stamping santa. I stamped him in Old Olive. Then as with the snowman, I pulled out my q-tip, I cleaned off the ink on the hat and then with my Stampin' Write Marker, I colored in the hat with Real Red. Lastly, I colored in Santa's face with Blush Blossom.


I have to say I am almost done wrapping presents. I feel like I am in the home stretch with the major part of the gifts wrapped and the Christmas cards out the door. Now I am hoping to make a few homemade extras for friends.

Sunday, December 14, 2008

Snowflake Treat Pail


Today's project is another project using the Decor Elements Sheet that Stampin' Up! sells. This time I used it to die cut the Snowflake #2 and I put it on a red pail that I got in the Target 1$ aisle. I put a half back pearl in the center. I then filled the pail with Hershey nuggets that I stamped with the snowflake from the Holiday Blitz stamp set. I put them in a cellophane bag and tied a bow with red wide grosgrain ribbon.


As for the tag on the side, it started with a piece of Holiday Treasures designer paper, followed by a strip of real read card stock. The greeting was stamped from the Sweet Serendipity stamp set. Lastly, came the snowflake stamped from the Holiday Blitz stamp set layered on 2 squares and adhered to the tag with Stampin' Dimensionals. I then punched a hole on top of the tag with my Crop-a-dile. I then attached the tag with linen thread to the pail. Next I tied a bow with the red grosgrain ribbon and attached it over the hole with a mini glue dot.


Saturday, December 13, 2008

Treat Holder

Here I took a simple glass vase and turned it into a treat holder. Lollipops and pixie sticks were decorated with our Deer Friends stamp images layered on top of punched out circles and scallops. I die cut the Join in the Cheer with our Chocolate Element Sheets and put them on the glass jar. The finishing touch was the Real Red Striped Grosgrain Ribbon tied around the vase.

Thursday, December 11, 2008

Love Scrapbook Page


Well I have to say I am loving the new Love You Much bundle. It is a sneak peak to the Spring Summer that you are going to be able to buy very soon. In the meantime, here is a scrapbook page made with the stamp set in the set for this week's color challenge. In the photo are my mom and my newphew this past winter. First I colored in the Love stamp set with my three Stampin' Write Markers with this week's colors: Green Galore, Night of Navy and Ruby Red. As you will see Green Galore very lightly used in this project. The only addition to the Green Galore was the brad in the center of the flower. I punched out the Love with my Paper Shapers 2 3/4" circle punch. I then took out the Scallop Circle #2 and die cut. Next came my polka dot stamp set which I stamped on a strip of white. The finishing touches were the Heart to Heart punches, ruby brads, a scallop border made with the slit punch and strips of ruby red card stock.

Wednesday, December 10, 2008

New Challenge

We just started another creative challenge within our Stampin' Up! group this one will challenge us to use different products, card sketches. The first one is to use our Home Decor vinyl art. Well I was shopping in Home Goods and found these great little candles on clearance. I decided to dress them up. So I took my Chocolate Decor Elements Sheet and punched out Hearts from our new Heart to Heart punch. Yes, this a little sneak peak into the Spring Summer Idea Book & Catalog!!! It was so easy to do, just punch, peel and apply to the candles.

Click here to see what my friend Kelly made for the challenge. It is absolutely beautiful. Look how quickly the everyday just was spiced up.

Tuesday, December 9, 2008

2008 Retirement List is Out AND 2 Specials

Good Morning Everyone! The 2008 Retirement List is Out.

Stampin' Up! has just released their list of retiring stamp sets. Starting today and going through December 23rd, Stampin' Up! is offering 10% off all stamps on the retirement list. They're also offering FREE SHIPPING on all orders of $70 or more.

Click HERE for the complete list that you can print out.
Click HERE to place your order. Click on the Shop Now button on the top right hand corner.

To see the retiring stamp set with photos, click on the following link.

The last day to purchase retiring stamp sets is January 18, 2009. Act quickly before your favorite stamp sets are gone forever.

The List of accessories that will be retired will be announced on January 5, 2008 so stay tuned for that ...

The new catalog that will be released January 19, 2009.

Here is the complete list of stamp sets retiring:

Ahoy, Matey*
Baby Jesus Is Born
Beautiful Life*
Big Birthday Candle*
Brocade Basics
Bronc Buster
Bundled in Love
Bursting with Joy*
Calendar Cues
Canvas
Classic Backgrounds
Crab & Company
Dad’s Day*
Dots Are Hot
Elegant Notes
Everyday Flexible Phrases
Everything Baby
Fabulous Flowers
Floral
Form & Function
Fruit Stand
Ginormous Flowers
Happiness
Hattitude*
Haunting Halloween
Hi & Hello*
It’s All Good
Just Golf
Just Hockey
Keep Christmas
Kind Thoughts
Light unto My Path, A
Merry & Bright
Moose You
On the Fly
Paisley
Perfect Timing
Pictograms
Posy
Pretty Peony
Riot of Petals*
Seasonal Whimsy
Seriously Sassy*
Sleigh Bells Ring
So Cool*
Spring Pictograms*
Starstruck
Stemming From*
Stitched
Summer by the Sea*
Take Three
Text & Texture
Thanks for Everything
Thoroughly Thankful
Tree for All Seasons, A*
Twill
Warm Words*
Well-Worn Alphabet
Well-Worn Numbers
Winds of Grace
Wishing You Cheer
With Gratitude
Wonderful Words
Wondrous Gift

HOSTESS SETS
Best Yet
Bitty Basics
Deer Friends
Fall Flair
Happiness Always
Live Like You Mean It
Occasions Collection
Organic Grace
Punches Three
Serene Spring
Window Dressing
Todo lo mejor
Imágenes pequeñas
Adorables amigos
Felicidad eterna
Vive con propósito
Colección de motivos especiales
Tres Troqueles
Serena primavera
Adornos para ventanas

*Dormant sets were not featured in the Fall-Winter 2008 Idea Book & Catalog, but were still available for sale. These sets are now retiring and will no longer be available.

**These page numbers refer to Celebrando Creatividad. All other page numbers refer to the Fall-Winter 2008 Idea Book & Catalog.

This list of sets is as complete as we can make it at the present time (accessories have not been listed), but items may be added to or dropped from this list.

Monday, December 8, 2008

2 Happy Stampers


Yesterday I spent the day making Christmas cards with my cousin and her friend. Hi Girls! I found out that they are frequent visitors to my blog and were excited to hear that today's blog entry would feature them. So here is the two of them stamping away. My cousin brought a big Christmas paper pack that she bought in Michael's. We came up with 3 cards designs with the paper pack for their classmates Christmas cards.

The first one we made was their punk rock Christmas. It was Pink Passion with Basic Black. They die cut the snowflake set #2 sizzlet with the Big Shot, added a black brad and some Dazzling Diamonds to the card. The greeting comes from the retired Mini Mates stamp set. The scallop edge finishes this card off.


The next card we die cut the Scallop Circle #2. Then punched the circle out with my jumbo circle from EK Success. Next we used the Stampin' Write Marker and colored in the gingerbread man from the Deer Friends hostess set. Then stamped the candy canes from the Holiday Blitz stamp set in Pink Passion. Followed by the greeting from the hostess stamp set Best Yet. The finishing touch was the Bravo Burgundy grosgrain ribbon adhered to the card and a bow attached with a mini glue dot.


The last card, we stamped the tree from the Holiday Trinkets stamp set. Then stamped the greeting from the retired hostess set, So Many Sayings. The tree was stamped in Wild Wasabi and the greeting was stamped in Bravo Burgundy. Then the finishing touches were the certainly celery wide grosgrain ribbon and the silver brads.

Sunday, December 7, 2008

Holiday Bazaar Table Display


I want to say hello to all my friends that I meet and that came by to see me yesterday at the Bazaar. Here is what my table display looked like. I also wanted to show my new raffle box. My old one was seeing better days. Here I took a plain cardboard box, stamped the Brocade Basics. I cut the oval shape with my Coluzzle cutting system. This only made the outline shape, I then had to take my hobby blade and cutting mat and cut deeper to make the oval shape. Lastly, the back of the box that was harder to stamp because the box top didn't fall flat, I covered with chocolate chip Patterns designer series paper followed by tieing a wide chocolate chip grosgrain ribbon.


Saturday, December 6, 2008

Free Make & Take Snowflake Ornament

Stop by and visit me today at the Wanaque Holiday Bazaar and learn how to make a free snowflake ornament that you can take home with you. Click here to see the details about the bazaar. Admission is free.

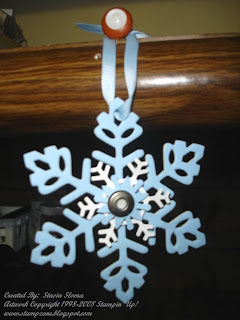
As for the ornament it is super easy to make. First I adhered a piece of bashful blue onto the chipboard. Next I die cut the Snowflake #2 with the cardstock and the chipboard with the Big Shot. Next I took out the Snowflake Set #2 and die cut the little snowflake. The last snowflake I used my snow blossom bunch and punched out the bashful blue card stock. I then put a pewter eyelet through the center with my crop-a-dile. I attached each layer of snowflake on with a dimensional. Then I tied a piece of bashful blue grosgrain ribbon for the ornament to hang.

Hope to see you today. There are over 40 vendors, great way to pick up last minute gifts or just get started!

Friday, December 5, 2008

Homemade Money Holder

I decided to make this week's color challenge into a homemade money holder for the holidays. The colors for this week are Real Red and Handsome Hunter. I started with a 8 1/2 x 11 white piece of paper. I scored it at 4 and 4. The 3 inch piece I cut on a diagonal so the money can be pulled out easy and not get stuck inside the pocket. I fastened the one side with a brad. The smaller side of the pocket, I put a little mono to keep the pocket in place. The inside I stamped the greeting Heard from the Heart and the holly from the Holiday Trinkets stamp set. To keep the pocket from opening, I put a velcro circle in place. Now to the front of the envelope. It started with the Real Red Patterns designer series paper. Which followed by a tailored bow. Then the two holly colored in and stamped with Stampin' Write Markers. The word merry, I stamped with the Schoolbook Serif alphabet, followed by the word christmas from the Fundamental Phrases stamp set. The finishing touches were the buttons and the scallop border.

Thursday, December 4, 2008

Another Scrap Page


Here is the 2nd page I finished for my dad. It features my niece in her princess outfit. The background is retired Berry Bliss paper. The greeting also comes from an old retired set, cute converse. I framed it inside styled silver. Some strips of metallic silver card stock, flower designer brads and pink taffeta ribbon complete the page.

Wednesday, December 3, 2008

Scrapping for my Dad

I was downstairs scrapping the other day. While I was scapping, my dad was looking through a pile of my photos and decided he wanted to take two of the photos. I said sure, but let me do something with them first. I wanted to find a way that he could hold onto them so they don't get scratched up and when he showed them off. So I decided to do a 6x6 pages and put them in the page protector for him to travel with. He really liked this photo with him, my brother and nephew when he was being born. It's 3 generation of Sloma men. The only one missing is my grandfather. Maybe during the holidays we can capture the picture for my dad. As for the scrap page, I used many retired products, Afternoon tea designer series paper, twill chocolate chip ribbon, pewter hodgepodge hardware, even the Soft Sky card stock. The only things not retired were the circluar frame from the Together Forever stamp set with the Lovely Letters S stamped in the center and pewter brads on the bottom of the page.


Tuesday, December 2, 2008

Scrapping Again


Hope everyone had a wonderful Thanksgiving. Here is a scrapbook page I've been working on. I used my On Board Loads of Letters to make the title. I sponge daubed white craft ink onto the letters, then sprinkled on top Iridescent Ice Embossing Powder and heat embossed them. The butterflies, I stamped from the Flight of the Butterfly stamp set and then cut them out and attached them to the page with Stampin' Dimensionals. I made the scallop edge with my punch and paper pierced the center. The finishing touch was the tailored bow made with my regal rose wide grosgrain ribbon and the styled silver hodgepode hardware.

Spend 20 and get 20% off

Spend $20 and get 20 percent off the selected stamp sets
Offer expires January 18th.

Item # Description
111564 Flight of the Butterfly
Retail Price $31.95
20% off $25.56

112911 Vuelo de la mariposa (Spanish Flight of the Butterfly)
Retail Price $31.95
20% off $25.56

111676 Puns from the Past
Retail Price $27.95
20% off $22.36

111660 Just Jawing
Retail Price $25.95
20% off $20.76

111624 Dreams du Juor
Retail Price $18.95
20% off $15.16

111700 Thank You Kindly
Retail Price $13.95
20% off $11.16

111714 Wow Flowers
Retail Price $12.95
20% off $10.36

112955 Flores llamativas (Spanish Wow Flowers)
Retail Price $12.95
20% off $10.36

111600 Bella's Bloom
Retail Price $12.95
20% off $10.36

December 6th - Wanaque Holiday Bazaar

Come visit me at the the...

WANAQUE ELEMENTARY SCHOOL PTA
ANNUAL HOLIDAY BAZAAR AND BOOK FAIR

Saturday, December 6, 2008
10:00 am - 3:00 pm
Free Admission

First Street in Wanaque in Wanaque, NJ

As a special gift to all my customers that come by and make a purchase from me the day of the bazaar, choose a free stamp set of your choice from my retired stamp set pile I will have to sell that day.

COME AND SHOP THE LARGE VARIETY OF VENDORS THAT INCLUDE:
Tastefully Simple
Mary Kay,
Lia Sophia
Leah's Charms
Partylite
Arbonne International
Avon
Big Jude's Roasted Nuts
Oh! Fudge
Spookie's Cookies
Pampered Chef
The Bag Ladies
Longaberger
Glaze Accessories
Stampin' Up!
Devour Chocolates Company
A Girl from Jersey Creations
"Wishes" gift baskets
Colorful Creations
Liane Fried Studio
Abalone Gift Shop
Boone Signed Sports Memorabilla
Webkinz/Barbies
Down Under Cafe'
and dozens more!

JOIN US AND GET ALL YOUR HOLIDAY SHOPPING DONE!