Friday, October 31, 2008

Happy Halloween Everyone


Happy Halloween Everyone! Here are some quick Halloween gift packages. One is to put pixie sticks or if not pixie sticks then pencils and pens. I used a piece of Confetti Cream, cut at 2 1/2 x 11 and then I scored at 7 and folded the piece of paper up and I stapled the sides. Then on top I put a scallop edge border made with our punch. On the bottom, I put a paper pierced border. The pumpkin was made with 3 large oval punches followed by a word window punch for the stem. I sponged the edges with my daubers to give the pumpkins dimension. The greeting comes from the All Occasions stamp set. The finishing touches on this project were the corners rounded on top and grosgrain bow.


For the next project, take a 11"x 4" strip of paper, score it at 5, 6, 7. Cover the large sides with a pieces of designer series paper. I covered mine with Summer Picnic designer paper. The top I took my scallop circle die cut and cut it out with the Big Shot. I then took out the coluzzle and cut a circle to put on top. To keep the scallop in place, I put velcro on the inside so the top can come off easily and the treats can be accessed. I tied the gingham ribbon on the top of the holder by making holes with my crop-a-dile and tieing knots on the other side to keep the ribbon from going through. The ghosts come from the Holiday Blitz stamp set and the greeting comes from the Tasty Sweet stamp set. The finishing touch was the black buttons and the black gingham ribbon tied in a bow on the bottom.
Enjoy your day!!

Wednesday, October 29, 2008

Another Scrapbook Page


Here is another scrapbook page that I made with a picture of my nephew on his christening day. It started out with the Manchester designer series paper. I stamped the title with Short Order and Lovely Labels stamp set. Next came border on top stamped with the All Scallops stamp set. I punched a circle with my 1 3/8" circle punch and put my cross punch in the center with a half back pearl. I rounded the photo by cutting it with my Oval coluzzle. The finishing touches was the scallop edge, the strips of card stock on top and the kraft taffeta ribbon.

Tuesday, October 28, 2008

Halloween Scrapbook Page


For this week's color challenge, I came up with a Halloween scrapbook page. The colors are More Mustard, Really Rust, Pumpkin Pie and Basic Black. I started with the candy corn from the Tasty Sweet stamp set and coloring them in with my Stampin' Write Markers. Next I die cut the title with the Go Go Boots Big Shot die. I stamped the word yum yum in between the strip of pumpkin pie and basic black card stock. Lastly, some buttons finish off the page.
Make sure to check out the following links for more ideas using the color combos of the week from our color girls: Colleen, Debbie, Lorraine, Kelly, Chris, Traci, Dana and Tracy.

Monday, October 27, 2008

Halloween Homemade Treats


How adorable are these homemade Halloween treats from my friends Tracy and Colleen!!! Here is the great Werewolf made from punches and our Big Shot Top Note. She attached a pack of M&M's on the back. Click here to see more Big Shot Frankenstein, Dracula and the Mummy made by Tracy on her blog.

Then I got this great Hot Cocoa mix with Halloween marshmellows! She stamped the retired Booglie Eyes in Staz-On on the plastic cone. What a great gift to give for Halloween.


The last one is from Colleen. She made this fabulous candy holder with our Eat Drink and Be Scary stamp set and the Ghostly Greetings designer series paper. Make sure to check out her blog she has been making and posting all sorts of Halloween treats on her blog the last couple of days. Click here to see them.

Saturday, October 25, 2008

Ready for Halloween?


Are you ready for Halloween? I spent the day with my stamping buddies, Colleen and Tracy yesterday so I have a few projects to share with you. Here are two tags I made for Halloween goodies. One is to put on top of Halloween presents I am giving my niece and nephew. I started with the Scallop #2 die for this project. I cut it out with my Big Shot and then took my Coluzzle for the circle inside. I stamped the hat from the Eat, Drink & Be Scary stamp set in Elegant Eggplant. I cut it out and then put a strip of black grosgrain ribbon on the hat. I then tied a knot and attached it with a mini glue dot. I then stamped the pumpkin from the set and cut it out. Both of the images were attached with Stampin' Dimensionals to the tag. I stamped the greetings from the Halloween Frights stamp set from the Holiday Mini as well. Lastly, three black brads finish the tag off.

The next tag uses similar products. This tag I am going to put on a bottle of wine that I am bringing to my sister's tonight. I got the inspiration when I was in Target when I saw a wine bottle bag that said the same thing, witch's brew. I was like I can do that. This time I used the larger scallop circle with two coluzzle circles for the center. I stamped the words with the ABC Alphabet lower. I have to say I really like this alphabet. I love the clean crisp words. The hat is now in pumpkin pie. I stamped the spider from the Eat, Drink & Be Scary stamp set. A black button finishes the tag off. Now all I need to do is punch a hole with my crop-a-dile and tie it to a bottle of wine.

Friday, October 24, 2008

Manly Homemade Card


Here is a card I made a while ago. It uses the retired LeJardin designer series paper. I stamped the initials with the Lovely Letters stamp set and cut it out with the Coluzzle cutting system. I then stamped the swirl in Sahara Sand. A strip of Always Artichoke and buttons finish the card off.

Thursday, October 23, 2008

Someone from the Past

I needed to make a card for my brother so I pulled out the retired Unfroggetable stamp set for his Get Well Soon Card. The frogs in this set can cheer up anyone especially with googlie eyes. I stamped the mushroom first and then had a mask made which I put right on top so I could then stamp Mr. Froggie to the top and have it seem like he is sitting o the mushroom. I stamped the images on Watercolor paper which really helps t make the project look more polished when coloring with our Stampin' Write markers. I then punched him out with out 1 3/8"circle and put googlie eyes on him . Next came the Kraft Patterns paper from our Hostess Exclusive Paper Pack. Then I stamped the greeting from the retired Mini Mates stamp set. Every time I think about getting rid of this set, I realize how many great sayings are in this set and since I am word person, I have a feeling this set will be around for a while. I stamped the greeting and then punched it out with our tag punch and then layered on another tag punch out. The finishing touches was the scallop edge and the caramel gingham ribbon.

Wednesday, October 22, 2008

Cheers to You!


I have to admit when I first saw the color combo for this week, I thought it was Not Quite Navy and More Mustard. So when I thought of the color Mustard, I remembered beer was that color. I was very excited, it gave me a chance to make a manly drinking card. So I made the C in Cheers with chipboard and my Serif Essentials Die Cut with the Big Shot and the Patterns Hostess Exclusive Paper Pack. Then I stamped the rest of the words with Schoolbook Serif Alphabet. Then with my Stampin' Write Markers, I colored in just the to you and stamped it. I stamped the mugs on my Watercolor paper which made the coloring with my Stampin' Write Markers come out beautifully with no streaks. Then I cut beer mugs I cut out and attached them to the card with Stampin' Dimensionals. I then took out the paper pack again and this time I punched a 1 3/8" square punch of the More Mustard designer paper and put it behind a clear button with some linen thread. Then a strip of More Mustard on the outside, a strip of Whisper White on the insidea and a scallop edge finish the card off. So I have to say I was very happy I got to use the beer mugs and I got to use my clear buttons with this card.

Monday, October 20, 2008

This Week's Color Challenge


Here is this week's color challenge, Not Quite Navy and Creamy Caramel. Here I stamped the butterflies from the Take Three stamp set in Creamy Caramel. Then I took my Stampin' Write Marker and colored in the 1st and 3rd butterfly with the Not Quite Navy marker. I then stamped the wish definition from the Define Your Life stamp set. The background of the card comes from our Patterns Paper Pack that is available exclusively to our hostesses. Then finishing touches were the taffeta ribbon, the halfback pearls and the scallop edge.

Make sure to check out the following links for more ideas using the color combos of the week from our color girls: Colleen, Debbie, Lorraine, Kelly, Chris, Traci, Dana and Tracy.

Sunday, October 19, 2008

All Grown Up Scrapbook Page


Well I have to say I am excited. I got another scrapbook page done! Yeah! This time I took a photo of 2nd cousins. They are all so big now. I remember when they were little. Now the are in the early 20's and some are teens. Where did the time go? I just got on facebook and they are all out there, Nick posted this picture of all of them. I just knew I needed to print it and do a scrap a page with them. They are all scattered in the US now, 3 of the in South Carolina and 3 of them in Upstate and the last 2 are in New Jersey. So I miss seeing them during the holidays.

So here's the page. I started with the Manchester designer series paper. I stamped the titled from the Schoolbook Serif Alphabet with Always Artichoke. The word up I cut out with my Coluzzle cutting system. I attached some pewter hodgepodge hardware and tied some twill tape to the top of the title. To thread it through on the top title, I used my horizontal slit punch. Next came the flowers, I first covered some retired On Board Accents & Elements with some So Saffron paper. I tied some twill tape in a knot and attached it to the top of the chipboard with a mini glue dot. The next two flowers I made with my Birds & Bloom Sizzlets Die and my Big Shot. I attached a Very Vanilla button to the top of the flower with a mini glue dot. Lastly the scallop edge and the photo corner punch finish the page off.

Saturday, October 18, 2008

Engagement Cards


Here is a few engagement cards I needed to make for the party I am going to. It's never easy anymore. I not only have to make one for myself, but then one for my mom and depending on the day, my brother or sister may come to me for one. So here are 3 cards. The first one is made with the Bella Rose designer series paper. I made the scallop circle with my Big Shot die with Sahara Sand card stock and cut the circle out in the center with my Coluzzle. Next came the chipboard heart from On Board Simon Upper covered in the designer paper. Next, I had a heart punch from EK Success that I purchased a long time ago that I made a smaller heart with. Next came the greeting from the retired Just So Sayings stamp set. Two vintage brads and some kraft taffeta ribbon finish this card. I also made a coordinating envelope with our five in one card cover envelope template. I tied some 1 1/4" grosgrain pink pirouette ribbon around the envelope.


Next came a card made with our Patterns Pink Pirouette Designer Series Paper. I used the Top Note Die Cut as my starting point made with the Big Shot. I stamped the greeting from the Full of Life stamp set. Then came some hearts made with the same punch from EK Success. Then some white tafetta ribbon, a scallop edge and pretties complete the card.


The last card I acutally used the engagement ring from the Holiday Blitz stamp set that I stamped within the Metal Edge Tag. I stamped the greeting from the Fundamental Phrases stamp set. I used some retired Soft Sky Prints designer series paper as well the double stitched ribbon. Then 2 silver brads finish the card.

Friday, October 17, 2008

Scrapbook Page Finally!


I have to say I am so excited I finally had a chance to do a scrapbook page finally! It's seems like there just hasn't been enough time to do any scrappin lately. I've been so busy at work and there has been so many occasions that have been coming up that cards have taken a precedent over any scrapbooking.

So here is my page. I just love this picture I took my niece and nephew with my parents at my nephew's christening. My parents just love Julie and Michael. So hence the title Love is being a grandparent. I used my Tim Holtz Grungeboard that I purchased from a fellow scrapbooker at the last crop, Darlene. I couldn't wait to use it. It is different from chipboard and that it is textured and it so flexible. It was a great deal, so many letters for such like 20$. I sponged on some Chocolate Chip craft ink onto the letters. Then I stamped the rest of the title with my Lovely Letters stamp set. I then placed it on top of the Manchester Designer Series Paper. Next was making the scallop edge, the twill tape tied in the knot, some Pewter jumbo brads and photo corner punch to finish it off.

Hopefully time will permit and some more scrapbooking will get done. I so miss it.

Thursday, October 16, 2008

Pink Pirouette and Riding Hood Red

Just yesterday, my friend Colleen was asking me what my favorite color combination of all is. She is starting to work on next year's color combinations for the week. I have to say it is Pink Pirouette and Riding Hood Red especially the way they are paired up in our Bella Rose paper. Here are two cards that I have had to make in the last month or so for birthday milestones that have occurred. The first one is a Sweet 16 card. I stamped the word sweet from our Schoolbook Serif Alphabet. The sixteen comes from the Short Order Numbers set that I stamped and then punched out with our circle punch. Then I took the heart chipboard from our On Board Simon Upper and cover with some of the Bella Rose. The Riding Hood Red Tafetta and the scallop edge finish the card off.

The next card was made for a 60th birthday. I used the my favorite big from the retired Think Big stamp set. Who knew when I purchased it I would be using it for all these milestone birthday cards. Then I pulled out my Short Order alpahbet and numbers for the rest of the greeting. I made the large flowers with my 5 petal flower and put a button from the Button Bouquet in the center. The small flower over the word big, I punched from the Boho Blossom punch and another button was added. Lastly a inverted scallop edge and a strip of Riding Hood Red finish the card off.

Wednesday, October 15, 2008

3 cards same products

Well here are three cards all using the Chocolate Chip Patterns designer series paper and the felt fusion flowers. The first one I took the Serif Essentials die cut and made my own chipboard letter. The fiinishing touches were the flower, the scallop edge paper pierced and wide chocolate chip grosgrain ribbon. The greeting comes from our hostess exclusive stamp set, the Occasions Collection.


The next card, I took out my Big Shot again and this time I used it with the Top Note die cut. I stamped the greeting Full of Life. Again the scallop edge came out and the wide grosgrain, just in different colors, Old Olive. This time I layered the flowers and put a Old Olive brad through the center.


The last card I used Punches Three stamp set. I colored in the the greeting with my Stampin' Write Marker and punched it out with the Scallop Square punch. I cut a square with my hobby blade in the front of the card to make a window. Then on the inside of the card, I put the True Blue Friend with Stampin' Dimensionals and attached the felt flower to the greeting. The scallop edge was used on this card as well. This time instead of using ribbon, I used a strip of very vanilla card stock.

Tuesday, October 14, 2008

This Week's Color Challenge

This week's color challenge is Pretty in Pink, Regal Rose and Old Olive. I pulled out my Upsy Daisy stamp set to make a birthday card for my downline. I colored in the flowers with my Stampin' Write Markers with all three colors that are a part of this week's challenge. I cut the flowers out with the Coluzzle cutting system. I then took my Big Shot and Scallop Circle #2 die, I made the frame for the circle I cut out. The background I stamped the Polka Dot background stamp. Then the bottom came a strip of Whisper White that I stamped the greeting on. Then I tied some Old Olive grosgrain ribbon that I put a Filigree Designer Series Brad through the center of the knot I tied. I just love these brads I was just happy to finally be to make a card that I could use them on.

Make sure to check out the following links for more ideas using the color combos of the week from our color girls: Colleen, Debbie, Lorraine, Kelly, Chris, Traci, Dana and Tracy.

Monday, October 13, 2008

Big Shot Snowflake and Mr. Twigster


Here is Mr. Twigster again paired up with the Big Shot Snowflake Die. I put Mr. Twigster in the middle of the die cut snowflake with Stampin' Dimensionals after I punched him out with my 1 3/8" circle punch. On the side there is a strip of Frosty Day designer series paper, a strip of confetti white and 2 black brads. The greeting comes from the Sweet Serendipity stamp set.

Thursday, October 9, 2008

Juntos Chipboard Leaves


Here is a fall thinking of you card. A member of my downline is not feeling good and I thought I'd send a hug in the mail to cheer her up. Homemade cards have a way of doing that. So here is a card made with chipboard leaves I made with my Big Shot and Sizzex Leaves Die Cut. I covered the chipboard with the Juntos designer series paper that is available only in our Celebrando Creatividad Spanish catalog. I really can't believe this paper is only in the one catalog and not in the main catalog. It is beautiful fall designer paper. Not to worry you can still purchase, check it out on Show Now on my Stampin' Up website under Paper and then Designer Series Paper.


Back to the card, I adhered the designer paper on to the chipboard, then I ran it through the Sizzex. Then came a strip of designer paper on top and on the bottom and a strip of Really Rust. The greeting comes from the Upsy Daisy stamp set which I punched out with my Large Oval punch. Three natural buttons and paper piercing on the bottom finish the card off.

Wednesday, October 8, 2008

One More Mickey & Minnie Card


I pulled out the Mickey & Minnie stamp set to make one more birthday card for my niece. I decided to use my 3 from the On Board Simon Upper chipboard as a starting point. I covered it my leftover designer series paper from the hostess exclusive Prints pack from the last catalog year. I then stamped the word big from the retired Think Big stamp set. The word the comes from my Short Order Alphabet. Of course Mickey & Minnie were stamped and then colored in with Stampin' Write Markers. I then proceeded to cut them out and attach the to the card with Stampin' dimensionals. The finishing touches were the flowers with pretty in pink brads punched out with the Trio Flower punch and the photo corner that was made with the prints designer paper. The background of the card, I stamped the Polka Dot background stamp set.

Tuesday, October 7, 2008

Birthday Greeting from the Mickey Mouse Clubhouse


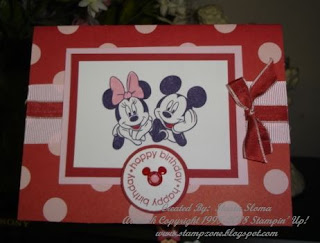
I have to say I love this stamp set from EK Success. It has all these Mickey characters and phrases. This is going to come in handy when I start scrapbooking. I am big Mickey Mouse fan. Here is a card that I made for my niece. The outside is simple enough. It starts with big Polka Dots from the Bella Rose Designer Series Paper. I stamped the image of Mickey and Minnie and colored it in with my Stampin' Write Markers. I then took the greeting from the Think Happy Thoughts stamp set, punched and layered it on top of another circle. In the center I put a Mickey Mouse eyelet that I got from Disney World a few years back and put a pretty in pink brad in the center. The finishing touch was the wide Pink Pirouette Ribbon laid down in the center card followed by the Red Riding Hood Taffeta ribbon and Red Riding Hood bow attached to the side with a mini glue dot.
The inside of the card is where the fun begins. I took the 1 3/4" circle punch and punched circle out of the black card stock. I then cut the circle and starting cutting it around to make a spiral. Click here to see a great tutorial on Splitcoast Stampers. I have to say here spiral looks a lot neater than mine. I then stamped Mickey and friends and colored them in with my markers and cut them out. I then attached each of them to the spiral with mini glue dots. Lastly, I punched stars out and put a black brad though the center. Then I took a big star and punched it out and stamped the let's celebrate from the On your birthday. Then I wrote the greeting in my uni-signal white gel pen. It says Happy Birthday Julie from all your friends at the Mickey Mouse clubhouse. I am going to mail this card so she will have a fun surprise in the mail. Of course, I showed it to my mom and she tells me I should put some little presents in the package like stickers or a lollipop. So I guess I will be going to the Disney store after work to see if I track down some little gifts to put in the mail with her birthday card from Mickey.

Who Does Pink Better than Minnie?

This week's color challenge is any shades of Pink. Well I just got these great Mickey Mouse stamps from EK Success in Target last night and I just knew I needed to do something for my niece's birthday. She is a fan of the Mickey Mouse Clubhouse. So who better than to do pink than Minnie herself? So her she is stamped, cut out and colored in my Stampin' Write Markers. I made the scallop note with my Big Shot and Sizzex die. I then took my Coluzzle cutting system and made the circles. The greetings come from the On Your Birthday set, the number three comes from the Short Order Alphabet. The finishing touches was the black gingham bow and attaching Minnie to the tag with Stampin' Dimensionals.

Make sure to check out the following links for more ideas using the color combos of the week from our color girls: Colleen, Debbie, Lorraine, Kelly, Chris, Traci, Dana and Tracy.

Saturday, October 4, 2008

World Card Making Day!

It's World Card Making Day today. I am off to a scrapbooking crop this morning. The croppers at today's event will get to make two cards in honor of today's event. They are the Big Bold Birthday card and the Halloween card that are featured in my October Open Workshop.

Starting today until the 11th, there is 20% off all Simply Sent Card Elements and Kits. Check out the details at the following link.

What better way to celebrate World Card Making day than to make a card for a friend. Here is a homemade friendship card I made with the Bitty Basics stamp set. I first started with stamping the images and coloring them in with my Stampin' Write Markers. I punched the coffee mugs out with my circle punch. Next I stamped the canvas background on a piece of Creamy Caramel. Then with my Cutter Kit, I made the swirl edge that I attached to the top of the card. I then took a strip of the same stamped paper and put the strip on the bottom which I tied a piece of pink gingham ribbon. The greeting come from the Hostess exclusive stamp set, Best Yet. The finishing touches was the scallop edge and the 3 Pretty in Pink buttons.

Enjoy your day and celebrate World Card Making Day by making a card today!

Friday, October 3, 2008

Homemade Sympathy Cards

Here are two homemade sympathy cards. The first I made with the With Gratitude stamp set.. I stamped the leaf image in Kiwi Kiss and then I took my Stampin' Write Marker and colored in Pumpkin Pie. I then took a water bottle and spritz some water onto the leaf and then stamped it onto a piece of confetti cream. I then tied a natural button with some thread to the side. The leaf was placed on a piece of Bella Rose designer series paper. The finishing touch was the scallop edge. The greeting comes from a retired stamp set, Brighter Tomorrow.

The next card, uses some of the same stamp sets and accessories. The differences in this card are: First, I colored in the image from Eastern Blooms with my Stampin' Write Markers onto Sahara Sand card stock. I then layered onto to two pieces of scallop edges of retired Old Olive Prints designer series paper I punched out.

Thursday, October 2, 2008

Homemade Christening Card


Here is a christening card I made for my mom. It has a mixture of old and new in it. The gown comes from a retired stamp set Buggies & Booties. I stamped it in Pink Pirouette along with the greeting from Fundamental Phrases. I cut the oval out with our Coluzzle cutting system. The designer series paper comes from the Bella Rose line. The finishing touch was the white taffeta bow that I attached a halfback pearl to the center with a mini glue dot and the scallop edge and a strip of Whisper White.