Monday, June 30, 2008

I've been tagged.


I have been tagged by two of my INK Sisters, Tracy and Kristin! I would tag another 7 sisters, but I have a feeling in the next couple of days all my blogging buddies are going to have this tag on there sites. I see Colleen has one on their already as well.
So I have to share 7 random and/or weird facts about me.
1. I come from a large family. There are 15 cousins on my dad's side and 19 of us on my mom's side of the family. On my dad's side, my grandfather actually has now 22 great grandchildren!
2. I have 3 Godchildren.
3. I love the Jersey Shore and spend at least one week a year on vacation down the shore.
4. I love to read. My favorite author is Sandra Brown. With James Patterson, John Girsham, Tami Haog and Danielle Steel all tied for second.
5. I am big country music fan. This was the first year, I actually missed the CMA awards on TV. I swear since tivo came into my life, I don't watch commercials, so I completely missed all the annoucements when it was coming on this year. One year, I actually was behind the scenes at the CMA's.
6. I love Chai Tea Latte from Starbucks. I have to thank Colleen for this obsession. I tried a sip of her tea on the way to the Philadelphia Regionals and I've been hooked ever since.
7. My day job is working in project manager in IT. In August, I will be there 10 years.

Sunday, June 29, 2008

Polka Dots & Paisleys


I have to say I am going to be really sad to see this set go, Polka Dots & Paisleys. It was a surprise set we received from Stampin' Up! in the mail. I just love the little flower in this set. Here it is paired up with Chocolate Chip and Real Red card stock. I colored the flower with my Stampin' Write Markers. I then stamped the greeting. A little red gingham ribbon was tied to paper clip and attached to the greeting. Then I stamped the polka dot background from the set on the Chocolate Chip card stock. The scallop edge was made with my slit punch. Then some paper piercing finish the card off.

Saturday, June 28, 2008

Another Card on Stamper's Showcase


What a week! Another card of mine made it on Stamper's Showcase this morning!

Stamps:
TIME WELL SPENT HOSTESS SET
POLKA DOT STAMP SET

Paper:
CARD STOCK BARELY BANANA 8 1/2X11
CARD STOCK BROCADE BLUE 8 1/2X11

Inks:
STAMPIN WRITE MARKER BARELY BANANA
CLASSIC STAMPIN PAD BARELY BANANA
STAMPIN WRITE MARKER BROCADE BLUE
CLASSIC STAMPIN PAD BROCADE BLUE

Accessories:
GLITTER DAZZLING DIAMONDS
RIBBON GROSGRAIN VERY VANILLA 5/8 INCH
2-WAY GLUE PEN

Friday, June 27, 2008

Berry Bliss Gable Box


One of my little friends just turned 10. She loves pampering her friends and family and giving them spa treatments. So for her birthday, I decided to put together some spa essentials. What better way to deliver all of them then in a gable box. So here I decorated the sides with Berry Bliss designer series paper. On the top I put a strip of chocolate chip wide grosgrain ribbon. The front of the box, I stamped spa essentials with my taffy alphabet. Then I took chipboard heart from teh On Board Accents and covered it with some more of the designer paper. I punched out some flowers with the Boho Blossoms punch and put a vintage brad through the center. Lastly, some designer paper, followed by a strip of wide grosgrain and grosgrain bow finish the box off.

Wednesday, June 25, 2008

Today is eScape Day

Today is Stampin' Up! first ever eScape day. It's a day to connect with family and friends. Turn off laptops, cell phones, pagers, PDAs, and all those other electronic devices that we've grown so accustomed to. Take the time to reconnect with friends and loved ones through personal communication. Well since I have to go to work, I know I can't escape some of those electronic devices. I did want to take a minute to talk about two of my stamping buddies and what their friendship has meant to me as well taking a minute to showcase some of their beautiful work. Two friendships, Colleen and Tracy that started with a love of the craft has become two special friendship that I have come to depend and cherish.

Tracy was great and that she did get a beautiful card in the mail to me to celebrate the day. Here it is made with the Pretty Petals stamp set. She colored the flowers in with her Stampin' Write Markers. She then colored in the greeting from Think Happy Thoughts and punched it out her circle punches. I love how she did that! The finishing touch was the wide grosgrain ribbon in the Old Olive color.

She also has given me 2 terrific baby cards that I've been meaning to post but I haven't had a minute to do so. One is made with the great stamp set in the Occasions mini, By Ones & By Twos. For you Stampin' Up! demonstrators, you may recognize this as a card that made it on Stamper's Showcase this week. She stamped the onesie on a piece of Berry Bliss Designer paper and then cut it out and attached it to the card. She stamped the Polka Dot background stamp. The scallop border was made with the 5/16"corner rounder. some grosgrain and gingham ribbon finish the project.

The next card also created by Tracy is made with the onesie template found on Lauren Meader's blog. She stamped the butterfly from the Sweet Shapes stamp set. The greeting comes from the Short & Sweet stamp set. The finishing touches were the scallope edges and the silver brads.
The next two projects came from my friend Colleen. The first one she made with the Fresh Cuts stamp set that is a sneak peak to the Fall Winter Idea Book that you can purchase now. She stamped in Silver ink and embossed the image. The greeting she stamped and then punche with her two ovals. The background is the Soft Sky Designer Series paper. The bottom of the card, she punched with the 1/4" inch circle Basic Grey card stock and then put a silver brad through the center.

Next project that I received from Colleen was a Jacob's ladder project. Click here to see the tutorial on how to make the project. It's a great way to showcase pictures or just have fun playing with it. Here she made it with some chipboard coasters, some ribbon and Berry Bliss designer series paper.

Hope you enjoyed the projects as much as I have enjoyed receiving them from my two talented friends.


Tuesday, June 24, 2008

Color Challenge with Pretty Petals


This week's color challenge is Certainly Celery, Eggplant Envy and Orchid Opulence. So here I took out my Stampin' Write Markers and colored in the background stamp Pretty Petals. I then I then stamped the butterfly a second time and cut it out and popped it up with a dimensional on the card. Next I stamped the greeting from the Full of Life stamp set from the Occasions mini. Only a few more days left for this mini, if you had your eye on something, email me and let me know so I can get your order in. Lastly a strip of Eggplant Envy was adhered to the card along with a white taffeta bow.
A few more of my Inkredible buddies have started the doing the weekly color challenge. So make sure to check out the following links for more ideas using the color combos of the week: Colleen, Debbie, Lorraine, Kelly, Chris, Traci and Tracy.

Monday, June 23, 2008

Two Sympathy Cards


Well I have to say this was not an easy week. I learned about two people who passed away. The first one took me by surprise. It was a friend of mine her little girl passed away. She was only 5. The were not able to find the cause of her passing, all they knew that it was that it had something to do with her lungs. Then the second one was a co-workers father. He passed away while he was on vacation visiting his family overseas. So please say a little prayer for them and their families with me.


The first card, I made was with Suger & Spice stamp set that was retired a few years ago. It was made with the Pretty in Pink Prints Designer Paper and Pretties. The little girl was colored in with my Stampin' Write Markers. The oval was cut out with the Coluzzle.

The second card was made with the Artfully Asian, Weathered Background and the retired stamp set Brighter Tomorrow. The flowers were colored in with my Stampin' Write Markers. The accessories were Kraft Taffeta ribbon and Pretties.

Sunday, June 22, 2008

On Stamper's Showcase This Morning!


I am so excited that one of my cards is on Stamper's Showcase this morning! I have to say this became one of my favorite color combinations when we did a few months, so I submitted for a contest. Here is the card made with Chocolate Chip, River Rock and Blue Bayou. Perfect for the men in your life.

Stamps:
FULL OF LIFE STAMP SET
CELEBRATE EVERYTHING STAMP SET
POLKA DOT STAMP SET

Paper:
CARD STOCK BLUE BAYOU 8 1/2 X 11
CARD STOCK VERY VANILLA 8 1/2X11
CARD STOCK TEXTURED IN COLOR 12 X 12
CARD STOCK CHOCOLATE CHIP 8 1/2X11


Inks:
CLASSIC STAMPIN PAD BLUE BAYOU
CLASSIC STAMPIN PAD CHOCOLATE CHIP

Accessories:
BRADS VINTAGE
JUMBO EYELETS PEWTER
PUNCH 1 3/8 INCH CIRCLE
PUNCH 1 1/4 INCH CIRCLE
PUNCH 1 INCH CIRCLE
PUNCH LARGE STAR
PUNCH STAR
CROP-A-DILE
STAMPIN DIMENSIONALS
SNAIL ADHESIVE PERMANENT

Saturday, June 21, 2008

Le Jardin and Lovely Letters Scrapbook Pages


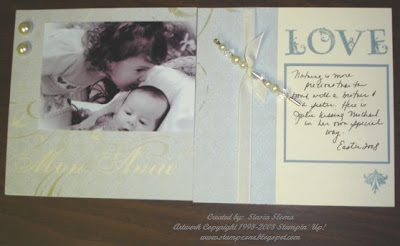
I was so happy I just got the Lovely Letters stamp set. I made the scrapbook pages with the Le Jardin designer series paper.I stamped the title with my Lovely Letters alphabet. I added some pretties and some whisper white taffeta ribbon to complete the pages.

Friday, June 20, 2008

Seriously Sassy


Here's a birthday card I made with the Seriously Sassy stamp set. I stamped the Freakin' Out Rose with Chocolate Chip ink on Pretty in Pink card stock and cut it out. I then made a scallop edge with my slit punch. Next, I attached a strip of Pretty in Pink Prints designer series paper that comes from the Hostess Exclusive paper pack. The finishing touch was the Chocolate chip poly-twill ribbon from the Occasions mini. Only a few more days left for the Occasion mini. Make sure you check the items before it's too late to own them.

Wednesday, June 18, 2008

Summer Sun Color Challenge


This week's color challenge is Summer Sun, Old Olive and Certainly Celery. I have a 60th birthday party that I needed to make a card for. It started with a piece of Whisper White card stock folded in half. Then I took my Coluzzle and positioned it so I could leave the top intact so the card would still fold. Then I took my 1" circle punch and punched out circles and attached them to the circle. Next came the On Board Simon Upper Chipboard in which I applied Certainly Celery Prints desinger series paper to. Next I stamped the greeting from the Polka Dots & Paisleys stamp set and the flip flops from the Holiday Blitz stamp set in Certainly Celery. Next came the little flowers which I created with the Trio Flower punch from the Three for You punch box. I put Old Olive brads through the center. Next I used my horizontal tab punch and threaded the Old Olive wide grosgrain ribbon through and tied it to the gift, a beach umbrella.

Tuesday, June 17, 2008

Homemade Gift Bag


Here is a gift bag I made for my grandfather made with the Creative License simply scrappin' kit which was a hostess exclusive kit available in the last catalog. Just add some designer series paper and some self-adhesive die-cuts and you have a beautiful gift bag in seconds. All I added was the stamped greeting in Wild Wasabi from the retired stamp set All Year Cheer II and some Blue Bayou double stitched ribbon.

Monday, June 16, 2008

July Open Workshop


July Open Workshop will be Monday, July 21st 7 p.m.

We will be making 10 gift cards for only 7$
Place a 30$ order or more and your class fee is waived.

Please RSVP as soon as possible for all events so that the card stock is ready for everyone to start stamping when the event begins.

Featuring stamp sets (in order as they appear on this entry): So Much, Older & Wiser, Sweet Shapes, Time Well Spent, Amazing to Zany, Circle of Friendship, Greetings Galore, Unfrogettable, Be Happy, Spring Solitude, Artfully Asian

Sunday, June 15, 2008

Spring Summer Collection Retirement List

Good Morning Everyone! Here is the Spring Summer Collection 2008 list of retiring stamp sets. The last day you can purchase these sets is August 10, 2008. Check back, July 21st for the list of retiring accessories!

I just went through all my blog entries until Jan 1, 2008 to mark all the entries that feature stamp sets that are retiring starting today. Click here to view them all the project samples. Please note, in some case it will be just a background to the card or just the greeting.

You can view the retiring stamp sets in the Stampin' Up! catalog that is available online at this link.

Email me your orders today and don't miss an opportunity to own all these stamp sets before they are gone!


28 Forever in My Heart
28 Sealed with a Kiss
30 Never-Ending Joy
31 Give Thanks
31 Peace to the World
32 Block Party
34 Snow Flurries
35 Festive Favorites
35 The Snowflake Spot
36 Peaceful Wishes
40 Eat Cake
48 Be Happy
50 Dilly-Dally
52 Dare to Be Darling
52 Greetings Galore
56 Artfully Asian
56 Perennial Favorites
56 Tagger´s Dozen
59 All Through the Year
60 Year after Year
61 Unfrogettable
62 Whale Wishes
64 Here, Kitty Kitty
64 Yappy Day
68 Sweet Thing
74 Elementary Essentials
86 Polka Dots & Paisley
87 Polka Dots & Petals
88 Wild Rose
92 Bud Basics
92 Just Like You
93 Two Cute
97 So Much
99 Blossoms Abound
100 Noble Deer
100 Wildlife Reserve
101 Happy Camper
104 Touch of Nature
110 Background Basics
114 All in a Row
114 So Happy
116 Big Pieces
116 Little Pieces
117 Sweet Shapes
118 Carte Postale
119 Trimtastic
124 Office Accoutrement
127 Labelicious
128 Create a Coupon
129 Stamp of Authenticity
130 Check It Out
130 Property Lines
134 French Flair
134 Weathered
135 Dotted
135 Flannel Plaid
135 Print Pattern
136 Flower Friend
136 Word Search
138 Amazing to Zany
139 A to Z Accents
141 It´s Your Birthday
143 Circle of Friendship
144 Much Appreciated
154 All Monogram Lower stamps from A to Z
159 Best Friends Alphabet Lower
159 Best Friends Alphabet Upper
159 Best Friends Numbers
159 Rough Edges Mini Alphabets

Friday, June 13, 2008

Stampin' Up! Special Guest Artist

Once a quarter publishes On Stage, to all their demonstrators celebrating their accomplishments, creatively, leadership and business skills. This quarter, Stampin' Up! contacted me to be interviewed for the Special Guest Artist article for On Stage!!! Unfortunately, I am unable to publish the article on my blog, but I will share some of the tidbits. I had to create two projects for the article. One was a scrapbook page which features my newborn nephew and a So Happy card. I also had to submit a picture of my family along with article unfortunately, I only had one picture and it was taken last year when we were on vacation. Hence, why the scrapbook page features my nephew. I didn't want him leave him out! They titled the article, an inspiring life. I have to say it exciting to see something written about you, see your work on the same page and your family photo on the same page. The article talks about my stamping style and my love of Stampin' Dimensionals. For those of you reading this that are Stampin' Up! demonstrators, check it out on the Stampin' Up! website, it is on page 17 of Volume 1, Issue 1. What can I say I love Stampin' Up! So many dreams that I never thought possible have become a reality since the day I joined them. Who would have thought I would have an article written about me! Thank you for sharing in my excitement.

Thursday, June 12, 2008

Prehistoric Pals 12x12 Scrapbook Page

Here is my girly prehistoric pals 12x12 scrapbook page featuring my beautiful niece. I first started with stamping the dinosaurs from the set in Garden Green. Next came the flowers from the Polka Dots & Petals stamp set that I stamped in Regal Rose. The title was stamped in the Taffy Alphabet stamp set. The large circle I made my using my hobby blade and my cutting mat and using a plate as my guide. I used my 1 inch circle punch to make the scallop edge arond the circle. The center of some of the flowers I put silver brads through the center. I did a little journaling inside the designer label punch out in which I framed it with the Styled Silver Hardware. Lastly, the page on the right, I threaded the ribbon slide with white grosgrain ribon.

Tuesday, June 10, 2008

Wedding Card


Here is a wedding card made with the Year after Year stamp set. I stamp the cake with Basic Black and then I colored the outlines and the heart with my Stampin' Write Marker. Next I laid down some Pretty in Pink Prints Designer Series Paper from the Hostess Exclusive Prints Pack. Next I attached some halfback pearls from the Pretties kit. Then a strip of White tafetta ribbon was adhered in between the designer series paper and the white card stock. Next, I attached a bow made from the tafetta ribbon. Lastly, I stamped the greeting Mr. & Mrs. from the Fundamental Phrases stamp set.

Monday, June 9, 2008

This Week's Color Challenge


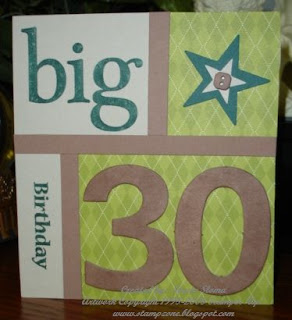
This week's color challenge is Old Olive, Close to Cocoa, Handsome Hunter and Sahara Sand. I have to say it wasn't the easiest challenge, but it may have been for the fact I was trying to do a 30th birthday card at the same time. I think a outdoor scrapbook page would have been easier to do with this color combo. So here I stamped the word big from the retired stamp set Think Big and birthday comes from the Just B stamp set. Next came sponge on the Close to Cocoa color to the chipboard numbers. In the background, I used the Old Olive Prints Designer Series Paper. I punched out the stars and put a close to cocoa button in the center. Lastly, I laid down strips of close to cocoa card stock to section off each of the elements of the card.

Sunday, June 8, 2008

Wallet Size Mini Photo Album

My mom wanted me to print out the most recent pictures I had of my niece and nephew so she can show them off at the latest party she went. So I printed out wallet size photos of some of our favorites. It started making me think, I wish I had a photo album small enough for her to put them all in. Then I remembered a project I did recent shoebox event and I realized I can make one for her.

So first I took a piece of Pumpkin Pie card stock, 4" x 7" and then scored it at the 1" mark and then at 4". The one inch score is actually tucked inside the fold. When it comes time to put the belly band on it, it will keep your photos safely tucked inside.

Next come the inside pages for the wallet size photos. I took three pieces of Very Vanilla and cut it 5 6/8" x 3 1/2" and folded them in half. To secure the pages in the album, I took two gold brads and fastened them in the center of the folded pages. The first page of the album and the last page, I adhered the pages to the pumpkin pie card stock to ensure the pages are secure in the album. Next I put a piece of Pumpkin Pie Prints Designer Series Paper and covered the front.

Next comes the belly band, I took a strip of Pumpkin Pie card stock and wrapped it around the album keeping it a little loose so you can pull the belly band on and off without any it getting stuck around the album. I secured the band in place with a layering of the flower fusion flowers that I put a Rhinestone brad through the center of the flowers and through the belly band card stock where the two ends met. Lastly, I stamped the word love from the Fundamental Phrases stamp set.

Any proud grandma would be so happy to have this in her purse to show off her grandkids. How great, every couple of months as the kids grow, you can make a new book and it only takes some card stock and accessories.

Friday, June 6, 2008

Priceless Homemade Shower Card


I have to say I am so grateful this is my mom's year to attend wedding and showers. She has 4 of them. I am happy to report that I don't have any to attend. So here is a shower card I made with the hearts from the Priceless stamp set for her. I stamped the hearts and the cut them out using the Coluzzle. Next came another circle with the Pretty in Pink. I paper pierced the pretty in pink circle using a needlepoint template. Next came the Pretty in Pink designer series paper from the Hostess Exclusive Prints pack. I stamped the word cherish from the Baroque Motifs stamp set. Some pink tafetta ribbon finish the card off.

Thursday, June 5, 2008

Inspiration from Paper Crafts


Here is my homemade father's day card for my brother inpired by the June/July 2008 issue of Paper Crafts. They made the photo a part of the card. I was like what a great idea. We are always trying to find stamped images to make a part of our homemade card, but why not our own photos a part of the homemade cards. So here I took a picture of my niece and nephew. Isn't this a great photo. Next came some Berry Bliss designer series paper and strip of wide grosgrain chocolate chip ribbon. Lastly, I pulled out my retired All Year Cheer II and colored in the word father with my Stampin' Write Marker. I punched out the greeting with the large oval circle. I then attached some Pewter Hodgepodge Hardware.

Wednesday, June 4, 2008

Happy Birthday to my Dad!


Here is the birthday card I made for my dad. It made with the Fall Flowers designer series paper and the Celebrate Everything stamp set. I started with a piece of Soft Sky card stock, next I laid down the designer series paper. Next I put the greeting down with on top of the Old Olive wide grosgrain ribbon. Then you will see there is a piece of Old Olive cardstock on top of the greeting as well as strip below the designer paper. Next, I added a strip of soft sky that I paper pierced. I also paper pierced the bottom of the soft sky. Next came the stars which I punched out with my large and small star punches, I also put a rhinestone brad through the center. Lastly, came two silver brads.

Monday, June 2, 2008

Big Flowers Scrapbook Page


This week's color challenge is Real Red and Barely Banana. I have to say I love what I came up with. Then again, I think it has a lot to do with the picture. I just love this picture of my niece. So here she is saying cheese! I started with using the spiral punch on piece of real red card stock. I attached a paper clip with real red grosgrain ribbon tied to the clip. Next, came stamping the title with a mixture of short order alphabet and taffy. Then I stamped the flowers from the Big Flowers stamp set and cut them out. I put a silver brad through the center and attached them to the page with dimensionals. I also punched out two red squares with the 1 3/8" inch squares. The top and bottom of the page, I added strips of real red cardstock to help frame the page. I also have to say I am especially proud of this page in the fact, I think this is the first time I didn't stamp something on whisper white or very vanilla. Thank you for looking.

Sunday, June 1, 2008

Homemade Graduation Card


Here's a homemade graduation card I made for my Goddaughter. I can still remember when she was a little girl, I can't believe she is all grown up and now a graduate. So here I took a piece of the Summer Picnic designer series paper from our Occasions mini and paired it up with the Great Grads stamp set. I stamped the word grad from that set and the then congrats came from the Fundamental Phrases stamp set. Next I punched some stars and put a gold brad through the center. I attached the stars and the greeting onto the card with Stampin' Dimensionals. In between the designer paper and the real red card stock you will find a piece of Pumpkin Pie grosgrain ribbon.