Thursday, January 31, 2008

He is here!!!


As some of you know, we have been waiting for a new arrival to our family, we'll my little nephew just arrived on the scene!!! He was born earlier today. That is all I know. My brother just sent me a phone text message. So I got see a picture of him. I will find out more details in a few short hours as I make my trip to see him. I am so excited. I don't know if I will get any sleep.

So exciting!!! Here is a card I made anticipating his arrival and it also gave me an opportunity to play with new stamp set Nursery Necessities. I stamped the star from the set and then punched it out with the Large Star punch and attached the card with dimensionals. I stamped the greeting rock-a-bye baby. Some paper piercing and Bashful Blue striped grosgrain ribbon. I just love this new ribbon!

Wednesday, January 30, 2008

Star Punched Congrats Homemade Card


Two of my downline are having special occasions happening this week. One just had her grand opening workshop and it was a huge success. The next one is celebrating an anniversary with Stampin' Up! this week. So to let them know how proud I am of their accomplishments, I made homemade conngratulations cards. So here is the card I made for the both of them.

The colors are Rose Red and Pretty in Pink. I started with the word congrats that I stamped with my Taffy Alphabet in Rose Red. The little stars I used from a retired stamp set, Small Sayings that was in one of the past mini catalogs. The stars were stamped in Pretty in Pink. Next, I attached some Rose Red Prints Designer Series Paper and strip of Pretty in Pink and Rose Red. I paper pierced the strip of Pretty in Pink.

Next came the stars that I punched out with my large and small star punches. The smaller stars, I put silver brads through the center and attached them to the card with dimensionals. On the larger stars, I also attached the stars with dimensionals. The finishing touches was tying some ribbon onto the paper clip and attaching it to the greeting. I still felt like the card was missing something. So I took out my Color Spritzer Tool and with my Stampin' Write Marker, I spritzed on some color.

Tuesday, January 29, 2008

Color Challenge with Urban West Rub-On


Here is this week's color challenge, Groovy Guava and Soft Sky. These colors make me think of the Southwest terra cotta pottery. Should be interesting what Colleen and Tracy come up with this week with these colors, so far I haven't seen this week's posting from them, but hopefully we should see something in the next couple of days.
As for me I punched 3/4" squares of Soft Sky and Groovy Guava. I applied the flower from Urban west rub-on to a piece of Groovy Guava and cut it out and popped it up and put it on top of the squares I put in arrange in a square pattern. The greeting comes from the One of a Kind stamp set. The Groovy Guava double-stitched ribbon finishes the card off.

Monday, January 28, 2008

Seeing Spots in Groovy Guava


Today's card is made with Seeing Spots. The colors are Chocolate Chip and Groovy Guava. I stamped the flower from the Seeing Spots stamp set. The scallop edge was made with the slit punch and some paper piercing. A strip of wide chocolate grosgrain was adhered between the floral background an the scallop edge. The greeting comes from the Sweet Shapes stamp set. Lastly, I punched the greeting out with Key Tab punch and attached two vintage brads and dimensionals on the back.

Sunday, January 27, 2008

Fun and Fast Notes and Holiday Blitz

Here is my try at a circular card. The colors are Cameo Coral and So Saffron. I folded my card stock and then spacing my coluzzle I cut the circle out leaving a space on top that keeps the fold in the card intact. I stamped the background with my Polka Dot Background stamp. I stamped the bird from the Fun and Fast Notes stamp set and colored it in with my Stampin' Write markers. I put a mini glue dot in the center and added some Dazzling Diamonds. The greeting comes from the Holiday Blitz stamp set. Then I took my colozzle out again and cut out the circle. Then with my 3/4" circle punch, I punched out circles and then placed then under the circle. Lastly, I punched the little flowers from my Trio Floral punch from my Three For You Punch box. I attached them to the card and then I set the eyelets in place. Lastly, a Apricot Grosgrain Ribbon bow was attached to the top with a mini glue dot.

Saturday, January 26, 2008

Priceless Always


Here is a card that I made as a card swap for my girls at the last downline meeting. The colors are Whisper White and Purely Pomegranate. I folded the card stock in half. Then on the side of the card, I started to make my scallop edge with the slit punch. After I made the scallop edge. I trimmed off the card stock from the card stock. Next, I attached the scallop edge. Lastly, I tied some Purely Pomegranate double stitched ribbon. I stamped the heart and then with my large circle punch, I punched the heart out. Then layered onto of a large scallop punch. I paper pierced the scallop and attached the scallop onto the card with dimensionals. Next, I stamped the swirls and the greeting from the Always stamp set. I attached the the silver brads. The finishing touch was adding some Dazzling Diamond to the swirls with my 2 way glue pen.

Friday, January 25, 2008

Urban West Rub-On Homemade Card Sample


This will be a quick and easy homemade card that I made for today. It's been one of those crazy days that nothing seemed to go right. I went to pick up my new computer today and they didn't have it ready when I arrived so I spent sometime doing aimless window shopping while I waited. I didn't get home until a few hours ago. Not to mention the crazy day I had at work. The full moon is in full effect out there for me.

So here is a homemade card that I put together with pieces that I had leftover from trying to come up with my color challenge for the week. So as you can see it's becoming a pattern with me. I use up all the scraps I have when I am working on something. Also the project doesn't always come together as quickly as I would like everytime.

So here I used the Friend rub-on from the Urban West collection. I put a silver brad through the center. The card stock is Whisper White and Blue Bayou textured card stock. I made a scallop edge with my slit punch and then with 1/8" handheld circle punch. I made holes through the center of the scallops. With my Boho Blossoms punch, I punched out little white flowers and put silver brads through the center. I attached to the card with dimensionals. Lastly some Whisper White tafetta ribbon finishes the card off.

Thursday, January 24, 2008

Wanted Color Challenge for the Week

Well here is my color challenge for this week. The colors are Blue Bayou, Soft Sky and Cameo Coral. I read my friend Colleen's blog and she said that this was a challenge and I have to say I agree. I believe it is the Cameo Coral that made it as challenging as it was. It is not a color I use frequently. So here I paired it up with the Wanted stamp set. I also got to use my rub-ons and I just have to say I love them!!!! I think I love the white rub-ons the most. I always like the way white looks when I stamp it, but I hate using my white craft pad. I just don't have the patience for it to dry! So with rub-ons it gives me the best of both worlds.

This weeks card I made it a pocket card with a photo inside. The blue bayou card stock and the soft sky come from our textured 12x12 card stock. I applied the Family Tradition rub-on from the Urban West collection. The piece of Soft Sky, I dry embossed the circles with my Crop-a-dile. Then I put a little strip of cameo coral under the soft sky. Next, I stamped the large scallop image from the Wanted stamp set in the three different colors and put a silver brad through the center. I punched them out with scallop circle punch. The soft sky image, I popped up with dimensionals. The insert of the pocket card, the photo, journaling and a tab made with our Round tab punch finish it off. Also I used my corner rounder to round off some of the edges of the pocket card. Click here to be brought to step by step instructions to make the pocket card.

Wednesday, January 23, 2008

Back to Work...Enjoy Every Moment Samples

I just got back from being away at my brothers for a couple of days. I got to spend time with my favorite little niece. She has become such a little chatterbox. It was Stasia this and Stasia that. Grabbing my hand and leading the way to where she wants to show me something or do something with her. I totally enjoyed my time with her.

Now, it's back to work. Here are samples made with Enjoy Every Moment. My friend, Diane, just started her Mary Kay business. Click here to be brought to her website. Here is a homemade gift bag and tag I made for her. The colors are Pixie Pink and Basic Black, the Mary Kay colors. The center of the word enjoy, I punched out one of the Trio Flowers from the Three For You Punch box and put a black brad through the center. The side of the card, I made a scallop edge with my slit punch and tied a piece of black gingham ribbon. I stamped the flowers from the set and cut them out. Then I punched a black circle with my 1/2" circle punch and placed in the center. The gift bag uses similar colors and techniques.


Inside the gift bag, I gave her one of the retired stamp sets from my collection Haute Couture. It has some great little make-up stamp sets in it. I just had to make this little gift tag for her. I stamped the images and the punched them out with the 1 3/8" circle punch and put it on top of the black scallop circle punch that I paper pierced. The makeup was colored in and then I put some crystal effects on the parts I left white and sprinkled some Dazzling Diamonds as it dried. Then word sparkle was stamped from the Warm Words stamp set. Some black gingham ribbon finish the tag off.

Sunday, January 20, 2008

Playing with Scraps from One of a Kind


Well as I finished my One of a Kind Scrapbook page the other day, I found that there were lots of punched flowers and colored in flowers that I ended up not putting on the scrapbook page. So as we all know as scrapbookers we throw nothing out. Here is card and a tag that I made. The card uses the color challenge of the week, so in this week we get two project from one challenge.

I took the large flowers from the One of a Kind stamp set and I colored them in with my aqua painter grabbing the color from the stamped image. In the center of the flower, I took one of the punches from the 3 flower trio and put in the middle with a Stampin' Dimensional after I put a gold brad in the center. The card, I stamped the Polka Dot background stamp onto the Eggplant Envy. Then a strip of Rose Red was put underneath it. The greeting comes from the Sweet Seredepity stamp set.

The tag uses similar features. The background of the Rose Red was stamped using the Polka Dot and Paisleys stamp set. The center of the flowers I put gold brads. I made the hole in the tag with my horizontal slot punch and tied a piece of wide grosgrain vanilla ribbon.

Saturday, January 19, 2008

Time Well Spent Homemade Gift Tags


Today, I got to spend some time stamping with some of my downline, sideline and friends. We got to make a few gift tags and also spent some time watching a DVD recording of the top secrets from demonstrator of the year. All in all a really good day, I just wish we had more time to spend together. I love spending time with my stamping buddies and it just never seems to be enough hours in a day when we get together. I have to say one of the number one reasons I love being a demonstrator is all the friendships I have made.

So here is some of the tags we worked on today. They feature the Time Well Spent stamp set we received as demonstrators. The first tag's colors are Brocade Blue and Pretty in Pink. The background of the stamp is from Polka Dots and Paisleys. The greeting comes from the Everyday Flexible Phrases. Three little squares were punched with the 1/4" square punch. The finishing touches are the button with linen thread and the Brocade Blue Wide Grosgrain Ribbon.

The second tag as well as the first, we first colored the outline with our Stampin' Write Markers. Then with the first tag, I colored in with our ink refill and our blender pens. The second tag, I colored in with our Aqua Painters. The colors in the second tage uses Barely Banana and Pretty in Pink. The background is the Polka Dot Background stamp. The background of the Pink circle, I used the dotted circle from the So Much stamp set and cut it out it out with our Coluzzle. The greeting comes from the Short & Sweet stamp set. Lastly, the finishing touches our the Pretty in Pink taffetta ribbon and the Vintage Brad in the center.

Friday, January 18, 2008

One of a Kind Scrapbook Page

This week's color challenge is So Saffron, Eggplant Envy and Rose Red. So I decided to make a scrapbook page with the colors and play with some of my new things that I got. I stamped the So Saffron Card Stock with the Polka Dot Background stamp set. The greeting comes from the One of a Kind stamp set. I stamped it in Eggplant Envy and then with my Coluzzle, I cut it out. With the 1/2" circle punch, I punched out several eggplant circles and then attached them to the back of the Coluzzle greeting. Then in between the Rose Red and the So Saffron card stock I attached a piece of Eggplant Envy grosgrain ribbon. Then I tied a bow and attached it to the greeting. Next I took the 3 flower stamp image and stamped it in Rose Red and So Saffron, then with coordinating Boho Blossoms Punch, I punched out the images. The Rose Red flowers, I popped up with Stampin' Dimensionals. I added some So Saffron buttons to finish the page off.

Thursday, January 17, 2008

Always Stamp Set


Well I took a break from all the cutting, to play with the Always stamp set. I have to say it was my absoulute favorite from the book. So here it is on an altered notebook. I stamped the bird from the set it Chocolate Chip onto Soft Sky card stock. I cut it out with the Coluzzle. Next I took 3/4" circle punch and punched out lots of little Chocolate Chip circle which I then adhered to the back of the large circle. Next I stamped the word Everything on Soft Sky and mounted it on Chocolate Chip card stock. The background is a piece of Chocolate Chip card stock, Fall Flowers Designer Series Paper and a piece of Wide Grosgrain Ribbon. On the spiral, I tied some Chocolate Chip Taffetta ribbon.

Wednesday, January 16, 2008

New Things Arrived


Well I am excited to say that my new things arrived today from the Spring Summer Collection, so in the next couple of days you should start seeing some new samples with the new stamp sets and accessories. That is after this stomach bug leaves my system. I haven't felt 100% all day today. Not to mention I have a lot of cutting in my near future. So I should be busy for a while!

Tuesday, January 15, 2008

Stamper's Showcase Today!


What a wonderful way to start the new year, I am on Stamper's Showcase this morning!!! Here is my card as well as the ingredients to make it.

Stamps:
PRICELESS STAMP SET
BAROQUE MOTIFS STAMP SET
Paper:
CARD STOCK WHISPER WHITE 8 1/2X11
CARD STOCK REGAL ROSE 8 1/2X11
Inks:
CLASSIC STAMPIN PAD REGAL ROSE
Accessories:
JUMBO WHEEL SO SWIRLY
RIBBON TAFFETA WHISPER WHITE 3/8 INCH
GLITTER DAZZLING DIAMONDS
PUNCH SCALLOP CIRCLE
PUNCH HORIZONTAL SLOT
2-WAY GLUE PEN
SNAIL ADHESIVE PERMANENT
STAPLER

Love Notes

Here are some love notes that we will be making at my downline meeting on Saturday. We are going to watch a DVD recording from our recent regional Stampin' Up! event where we got to hear first hand from Ronda Wade, demonstrator of the year, her 25 secrets to her success. I am so excited to share it with my group. She was so down to Earth and she makes you realize that success is within your reach. So since it is the start of 2008 and we all know it is time to start setting our goals. I figured what better way to start the year. Have you thought of becoming being your own boss or want to start your own stamping or scrapbooking business? Well if you have, stop on by and watch the DVD with us on Saturday or contact me and we can schedule a time for us to watch it together. Success is closer and easier than you think.
Well onto the love note cards we will be making. First one we are making is a donut hole card, to read how to do please click here to be brought to the blog entry with step by step instructions. As for this card, the card stock is Cutie Pie Designer Series Paper, Rose Red and Whisper White Love Note. The greeting comes from Seeing Spots. The flower was punched from the Trio Flower Punch from the Three For You Punch Box. I colored the center of the flower with my uni-Signal white gel pen and popped up the flower with a dimensional.

The next card also uses the Cutie Pie paper and a Whisper White Love Note. I adhered the Cutie Paper to the Love Note and then with my Round Tab Punch, I punched the center and the lined up the punch in the opposite direction to make my round circle. I stamped inside the circle the butterfly from the Garden Whimsy stamp set and the greeting comes from the Amazing to Zany stamp set. Some Dazzling Diamonds on the butterfly and the Purely Pomegranate Double Stiched Ribbon finish the card off.

How quick and cute are these cards. I may just need to make a few more to have on hand to attach to gifts.

Monday, January 14, 2008

Nursery Necessities
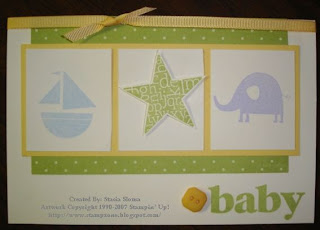
Here is a homemade card for a friend that just had a baby boy. It is using the Nursery Necessities stamp set and the greeting comes from Everything Baby stamp set. I stamped the boat in Bashful Blue, the elephant in Almost Amethyst and the star is in Certainly Celery. The star was cut out and attached with a dimensional. I mounted them all on a piece of Barely Banana and then a piece of the Designer Series Certainly Celery Prints Paper. I tied a piece of Apricot Appeal grosgrain ribbon and a So Saffron Button completes the card.

Sunday, January 13, 2008

Homemade Valentine's Day Card


I was looking at my pre-cut piles of card stock that I had left over from classes. So I was trying to bring new life to the cut up pieces of card stock. So here is a homemade Valentine's Day card I created by playing with scraps. The colors are Very Vanilla and Real Red. The heart and swirls come from the Priceless stamp set. The greeting comes from Holidays & Wishes. I stamped the heart onto the Vanilla pre-cut card stock and then with my scraps I stamped another heart. This one I popped up with a dimensional and attached to the card stock. I added some Dazzling Diamonds with my 2 way glue pen for a little bling. Next I tied some Vanilla taffeta ribbon. The scallop border I made with my 3/16 corner rounder and paper piercer.

Saturday, January 12, 2008

Homemade Christening Card


Here is a homemade card that I made for a Christening that I am attending tomorrow. It is a mix of some old and current Stampin' products as well as few others.


I first took a piece of designer paper from the retired Simply Scrappin' Kit, Today and Always. Using the Round tab punch, I punched it once and turned the paper and the punched the paper again to make the round circle and mounted in a piece of Whisper White cardstock. Then I took a cross punch from EK Success and put a halfback pearl in the center with my mini glue dot. Then the floral image I stamped from the Sell-a-bration set a few years back called Noteworthy. Next I put a strip of adhesive diecut from the scrappin' kit and attached it the bottom of the designer paper. Next I stamped the greeting from the Retired stamp set Buggies and Booties. Next I took a piece of Vellum and tore it and attached it to the Mellow Moss card stock. With my Crop-a-dile, I punched two holes towards the top and tied some white taffetta ribbon.

Friday, January 11, 2008

Stamp of Authenticity and Color Challenge of the Week

Here is this week's color challenge, Bashful Blue, Certainly Celery and Basic Grey. I am so excited, I came up with an idea using the file folder card template that my friend Colleen showed me how to do last Saturday. Click here and you will brought to step by step instructions on how to create the file folder pocket card.

The other thing that makes me happy is using the the Stamp of Authenticity stamp set. It was one of those that was a must have and then you find you don't use it as much. So in the background you will see that images stamped from the set. The flowers I stamped in the Canvas background first and then punched flowers out with the 5 petal flower punch. The center I put a natural button threaded with linen thread. The leaves I created with the small oval punch. First I crimped the card stock, then punched the oval and cut the oval in half. The flowers and the leaves were attached to the card with dimensionals. The sides of the file folder were stapled to keep the folder together. Some bashful blue ribbon tied the outside together.

I stamped the word happy birthday from the Amazing to Zany stamp set and punched it out the round tab punch. I attached it to the insert with my stapler. The inside insert, I edge has some Stamp of Authenticity stamped and the a piece of Basic Gray and some Bashful Blue grosgrain ribbon.

Click here to be brought to Tracy's blog to see what she created with the color challenge. Colleen is having a little difficulty finding her camera so hopefully we will see her creation soon.

Thursday, January 10, 2008

Crab & Company and Time Well Spent


Here are two more homemade cards samples from my shoebox swap. The first one is made with Crab & Company. The card stock colors are Kraft, Ruby Red, Bordering Blue, Close to Cocoa, Very Vanilla and Barely Banana. The Kraft paper was torn and then some Close to Cocoa ink was sponged on. Then we stamped with the Itty Bitty Backgrounds the speckles. The Close to Cocoa background we stamped the Canvas background and also tore and sponged some color on. We also did some sponging to the Bordering Blue sky. The crab, the shells and starfish were stamped and cut out. My finishing touches to the original card design was of course putting the googlie eyes on the crab, stamping the greeting from the Eat Cake stamp set. I then threaded a natural button with natural cord and tie it on top.


The next card was one that I created for the Shoebox event. It was a quick and easy homemade Valentine's card. The card stock colors are Confetti White and Rose Red. We stamped the heart from the Time Well Spent stamp set and colored it in with my Stampin' Write Markets. The Rose Red for the outline and the flower and Regal Rose for the center of the heart. I then put a silver brad through the center of the flower. Using my square punches, I made the layers to put under the heart. Some dimensionals were added to add dimension to the card. Lastly, the greeting from Holidays and Wishes was stamped on the card. The one thing I will note, coloring on our Naturals and Confetti paper with our Stampin' Write markers helps eliminate the color lines. If I colored on Whisper White, I would have seen some of the color lines.

Wednesday, January 9, 2008

New Look to My Stampin' Up Website

Stampin' Up! has updated our demonstrator website. It has a fabulous new look and there is so much great information on it. Check it out by clicking here and you will be brought to it. The link can also be found under My Stampin' Up! Links.

Embrace Life and Time Well Spent Card Samples


This card we made was created by Debby Kainu. The colors are Groovy Guava and River Rock. With the River Rock stamp pad, we stamped the leaf images in the background. Next we stamped the flower and colored it in with our blender pens and ink refills. Debby was so great, she already had the scallop edge done for us. All we needed to do was attach. I just made one or two changes to the original design. I did paper piercing and she instead had put white dots with her gel pen and I believe the ribbon was done a little differently, but I can't remember what the original looked like now.


The next card, I don't remember who was the original creator was at our Shoebox event. The card uses the Time Well Spent stamp set. The colors of the card are Purely Pomegranate and Regal Rose. The background of the card, we stamped the flowers in Regal Rose. Then we stamped the flowers and the heart on the white pieces of paper with Purely Pomegranate. With the Aqua painters, we grabbed some of the color from the stamped ink to give the images some soft shades of color. We tied some Purely Pomegranate double stiched ribbon and attached the small ovals where we stamped the word cherish from our Warm Words stamp set with a safety pin. We used the Ticket Corner punch on the white rectangle with the heart and the layer underneath that. Lastly, we stamped the greeting from Holidays & Wishes stamp set.

Tuesday, January 8, 2008

Embrace Life Homemade Card Samples

Here is the card that created by Dale Morin. The funny thing is that I was so anxious to get started I didn't realize I didn't stamp on the correct piece of paper. I started with the Confetti Cream first. So I stamped the images and colored them and then realized I had a piece of Shimmery White. So I stamped the image again onto the Shimmery White and colored it in and took the both piece home and assembled when I got home where I could cut another piece of Confetti Cream and make the card the way it was intended to be.

So the first card is the one created by Dale. The flowers from Embrace Life were stamped on the Shimmery White card stock. To have flowers overlap, Dale had a mask to cover up the first flower we stamped while we stamped the 2nd flower. We then took our Aqua Painters and grabbed the color from the Bravo Burgundy ink that we stamped flowers in. It was just enough ink to give a soft and beautiful look to the flowers. We then mounted the Shimmery Card stock onto the Bravo Burgundy followed by the Confetti Cream. Some Bravo Burgundy ribbon finishes the card off.

So now what to do with the images I stamped on Confetti Cream. Well, I put a strip of Bravo Burgundy onto the card and then using my Handheld Horizontal Slot punch, I made a hole towards the top of the card where it folds. I then threaded Very Vanilla tafetta ribbon.
As they always say there's no mistakes in stamping!

Monday, January 7, 2008

It's All Good Composition Notebook & Bookmarker


Today's project is an altered mini composition notebook and book marker made with a jumbo paper clip.

The notebook was covered with Rose Red Prints Designer Series Paper. The Binding on the book was crimped Purely Rose Red card stock. In between the card stock and designer series paper there is a strip of Purely Pomegranate double stitched ribbon that was adhered with monoadhesive.. I made a knot with ribbon and attached it with a mini glue dot.

The jumbo paper clip was decorated with the It's All Good Stamp, Live, Love and Laugh image. The image was stamped and then cut out and mounted onto square punched out with our square punches. They were attached to the clip with Stampin' Dimensionals. I tied a piece of the Purely Pomegranate to the jumbo paper clip.

Sunday, January 6, 2008

Priceless Donut Hole Punch Card


Here is a card that was created by Dawn Rapsas. The only thing I added was the greeting. To me a card isn't a card without some greeting on it. :)

The great thing about this card although you can't see it. Is the circle image from the Priceless stamp set that was stamped on the card actually appears on the inside of the card. So to create the effect we need to create all the windows on the front layers of the card.

To do this, you first need to attach your Groovy Guava Prints Designer Series Paper to the Vanilla cardstock just lightly with mono. Just so it holds it in place while you punch, but so that you can pull it up after you are doing your punching.

So you take the 1 3/8" circle and position at the top of the card as far down it will go and center in the center. So you will be punching through the Very Vanilla card stock and Designer Series Paper.

When you are done remove the Designer Series Paper.

Next attach the Designer Series Paper to the Purely Pomegranate card stock again only attach it lightly, so that you can easily remove once the punching is complete. You will re-punch the 1 3/8" circle again.

Remove the Designer Paper from the Purely Pomegranate.

You will now position the Scallop Circle punch around the hole that was left behind on the Designer Series Paper and punch.

Your scraps of paper that will be left behind if you did the steps correctly will be a 1 3/8'' circle punch of Very Vanilla, Purely Pomegrante, Designer Series Paper. Then you will have a scallop circle, but it will have donut hole in the center.

Next, just attach all the card stock layers. Stamp the image in the center of the card.

My added touch to the card was stamping the greeting Priceless on Very Vanilla scraps and punch it out with the Key Tab punch. I then took the handheld rectangle punch and punch holes on the sides of the greetings. I then threaded the Purely Pomegranate card stock through the bottom to the top and attached a gold brad. I then took the other side of the ribbon and threaded under the card stock to the other side and attached the gold brad again.

Saturday, January 5, 2008

My Christmas Gift - A Year of Color

My friend, Colleen, gave me a fabulous Christmas gift this year. It is a Year of Color. She put together a new color combination for each week of the year. I absolutely love it. So every week, I am plan on taking the challenge and coming up with a new project with the color combo of the week. I hope you can take the challenge with us. Email them to me and I would love to post your creations on my blog. Click here to see Colleen's creation.

I have to say the first one was a challenge for me. We were actually together last night stamping, so I took her challenge during our stamp night. I thought it was Real Red and White, so I started making a Valentine's card and then she was like where is the Black. So I had to change my whole way of thinking and come up with a card with black in it. So here is my card with Real Red and Basic Black color challenge. It is uses the Office Accoutrement stamp set. I stamped various pieces of the stamp images and cut them out. The small flower and important message were attached with Stampin' Dimensionals. I put a Basic Black button in the center of the large flower. The red background, I stamped the calendar stamp and stamped the March with the Short Order Alphabet.

Embrace Life Box

Here is a box that we made at the Shoe Box Swap that was created by Robin Boyer. She picked up the pattern from fat cat stamper. The box starts with a 8 1/4" x 8 1/4" piece of Sage Shadow card stock and scored each side at 2 3/4". Then each corner was scored diagonally. See the diagram for a picture of the score lines. After the scoring was done the sides were folded up and the corners folded out and then crossed over each other held in place with a Pewter Jumbo Eyelet.


We decorated by box with blossoms from the Embrace Life stamp set. The image was colred in with ink refills and blender bens. The Colors are Sage Shadow, Groovy Guava, Ruby Red. The box was embellished with a silver brad.

Friday, January 4, 2008

Enjoy Every Moment in Valentine's Day Colors


I think I finally had a chance to organize and go through all the projects I made at my shoebox swap from the past weekend. So the next couple of posts will be from that event. I made so many great projects thanks to the creativity from all the talented ladies that attended the event. In fact, two of the projects for this month's Open Workshop came as ideas from the event.

Here is Enjoy Every Moment in Valentine's Day color combinations. The card is Pretty in Pink , Regal Rose and Real Red. The little circles in the background of the card came from the Enjoy Every Moment stamp set as well. They were stamped in Real Red. What a great color combination. The red on pink. The side of the card, we used the Double Rectangle punch and threaded through Regal Rose Wide Grosgrain Ribbon.

Hope these projects inspire you for you Valentine's Day cards and projects.

Thursday, January 3, 2008

Enjoy Every Moment CD Holder


Here is a homemade CD holder made with the Enjoy Every Moment stamp set. This is a great way to share photos with friends and family. I stamped the greeting and then used the Flower Treo punch from the Three For You Punch box. I put a silver brad through the center and attached to the greeting with a Stampin' Dimensional. The background of the CD holder is the Polka Dot Background stamp set and I attached Almost Amethyst Prints Designer Series Paper. A strip of White Grosgrain Ribbon was put inbetween the card stock and the Designer Paper. The Pewter Jumbo Eyelet was attached with my Crop-a-Dile and I tied white grosgrain ribbon to hold it together.

Wednesday, January 2, 2008

The Spring Summer Collection is Now Available


The new Spring Summer Collection is Now Available and can be viewed on the Stampin' Up! website. You can access it by clicking here.

Make sure to check out all the fabulous new designer paper in the book. Here are chart to help you know what the coordinating colors are. These are great as a reference when planning projects and when trying to come up with new color combinations to use in your projects.

Enjoy looking through the catalog!


Azure: Brilliant Blue, Very Vanilla

Bali Breeze: Old Olive, Taken with Teal, Rose Red, Pumpkin Pie

Berry Bliss: Purely Pomegranate, Pretty in Pink, Close to Cocoa

Cutie Pie: Bashful Blue, Basic Black, Certainly Celery, Rose Red, So Saffron

East Coast Prep: Real Red, Wild Wasabi, Tempting Turquoise, More Mustard

Flowers for You: Certainly Celery, Lovely Lilac, Regal Rose, Tempting Turquoise

Fall Flowers: Old Olive, Really Rust, Soft Sky, Sahara Sand

Ginger Blossom: Ruby Red, River Rock, Cameo Coral, Groovy Guava

Jersey Shore: Wild Wasabi, Pumpkin Pie, Brilliant Blue, Bashful Blue

Le Jardin: River Rock, So Saffron, Very Vanilla, Always Artichoke, Bashful Blue

Notebook: Soft Sky, Kraft, Vanilla

Olive Press: Old Olive, Very Vanilla

Porcelain Prints: Blue Bayou, River Rock, Wild Wasabi

Spring Break: Old Olive, Pumpkin Pie, Blue Bayou, Soft Sky

Spring Fling: Certainly Celery, Sage Shadow, Pretty in Pink, So Saffron

Spring Silhouettes: Wild Wasabi, Certainly Celery, Soft Sky, Very Vanilla

Western Sky: Ruby Red, River Rock, Blue Bayou, Soft Sky

Tuesday, January 1, 2008

January Open Workshop


I would like to invite everyone to my January Open Workshop

I will be holding the event on two dates: January 27th 2 p.m. and January 29th 7 p.m.

We will be making 3 projects: Valentine’s Day Treat Bouquet, Viewfinder Card, and a Happy Birthday Card. The workshop fee is $15 and it will be waived with a 50$ order.
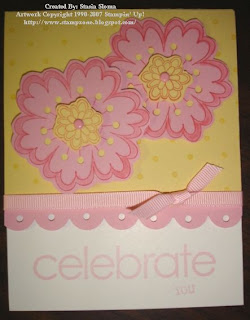
Please RSVP as soon as possible for all events so that the card stock is ready for everyone to start stamping when the event begins.

RSVP before January 13th and there will be additional project for you to make!

Featuring stamp sets (in order as they appear on this entry): Big Flowers, Celebrate Everything, Time Well Spent, Enjoy Every Moment.

Sweet Treats - January Promotion


Hostesses:

In January if you host a 350$ workshop and you get your choice of free stamp set from the list below from the new Spring Summer Collection:

111089 Happy Heart Day
110797 A Beautiful Thing
110992 A Little Birdie Told Me
111097 Mark the Date
109525 Celebrate Everything
111011 Embrace Life
111049 Nursery Necessities

Customers:

Purchase the Valentine's Day Bundle (item #111903) for just $33.40 and get Regal Rose wide grosgrain ribbon--FREE!

The Valentine's Day Bundle includes :
111089 $20.95 Happy Heart Day Stamp Set
109052 $7.95 Real Red Wide Grosgrain Ribbon
102757 $4.50 Medium cellophane bags
109056 FREE Regal Rose wide grosgrain ribbon
-----------------------------------------------------
111903 $33.40 Valentine’s Day Bundle